You know that feeling when you open a pack of Biscoff cookies on a flight and suddenly the whole tin is gone before you hit cruising altitude? Yeah. Now imagine that flavor — that warm, spiced, caramelized, absolutely dangerous flavor — baked into a stunning layer cake with Biscoff buttercream and a generous drizzle of cookie butter on top. This cake is not playing around, and honestly? Neither are we. Let’s bake.
Quick Look at the Recipe
| 🎓 Skill Level | ⏱️ Prep Time | 🍳 Cook Time | ⏰ Total Time |
|---|---|---|---|
| Intermediate | 30 minutes | 35 minutes | 1 hour 30 minutes (including cooling) |
| 🍽️ Servings | 📋 Course | 🌍 Cuisine | 🔥 Calories |
|---|---|---|---|
| 12 slices | Dessert | European / Belgian | ~580 kcal per slice |
Why This Recipe is Awesome

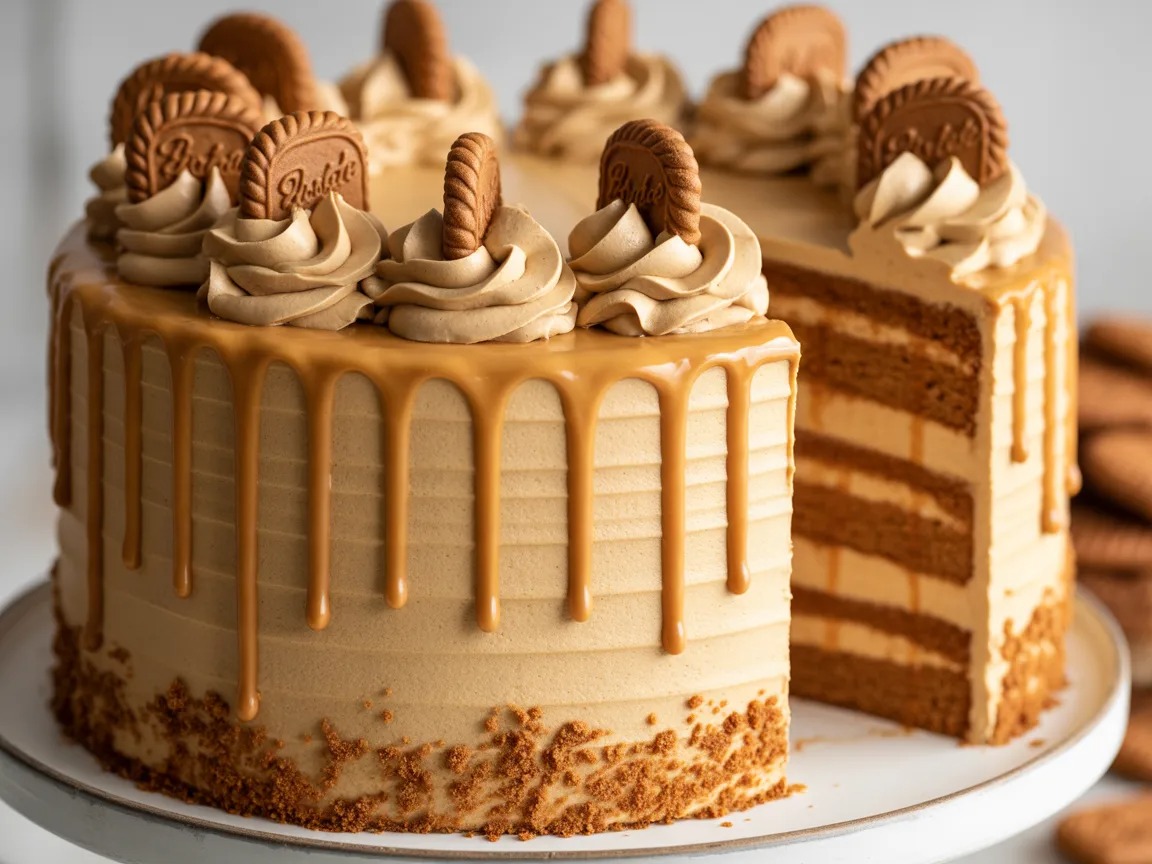
Let’s just say Biscoff cake is what happens when a humble cookie spread decides it’s done playing second fiddle to Nutella. This cake has three layers of soft, brown sugar sponge, a cloud-like Biscoff buttercream frosting, crushed Biscoff cookies pressed into the sides, and a molten drizzle of cookie butter cascading down the top. It’s basically a showstopper — and the best part? It’s genuinely not that difficult to pull off.
You don’t need fancy equipment or pastry school credentials. You need butter, Biscoff spread, a mixer, and a healthy disregard for your diet for one glorious day. FYI, this cake also earns an embarrassing number of compliments at parties — so bring a copy of this recipe because people will ask.
Ingredients You’ll Need
For the Cake Sponge:
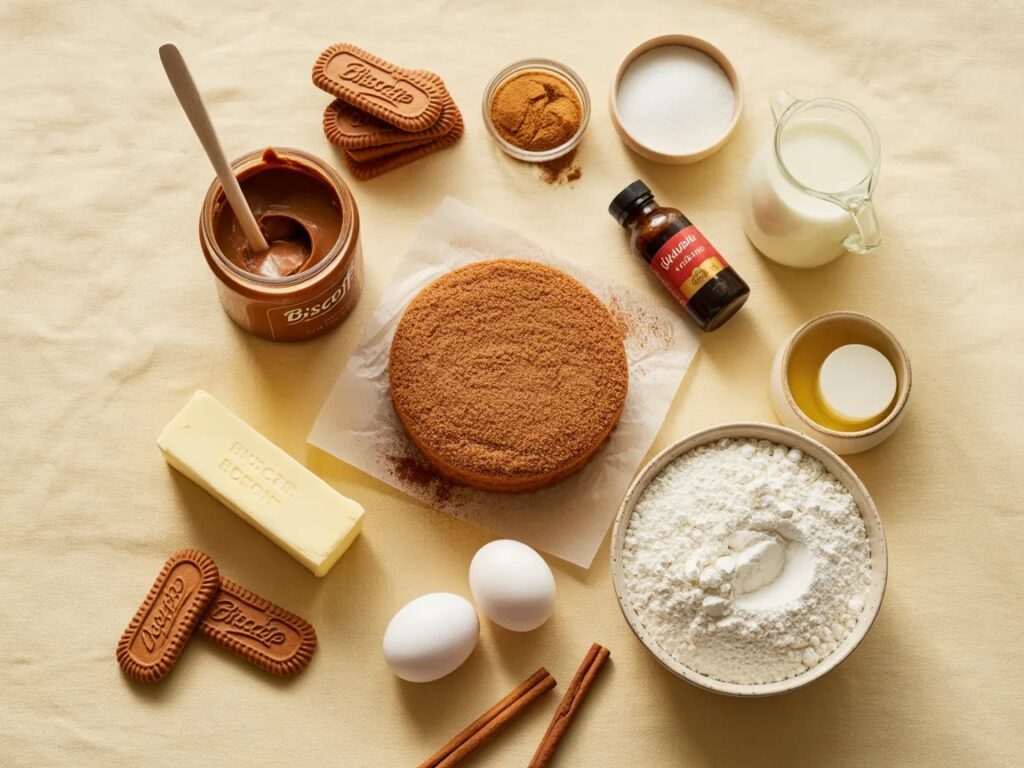
- [ ] 2 ¼ cups (280g) all-purpose flour — the foundation, boring but essential
- [ ] 2 tsp baking powder
- [ ] ½ tsp baking soda
- [ ] ½ tsp cinnamon (just a whisper — it complements the Biscoff beautifully)
- [ ] ¼ tsp salt
- [ ] 1 cup (225g) unsalted butter, room temperature (take it out early, seriously)
- [ ] 1 cup (200g) light brown sugar — packed, not shy
- [ ] ½ cup (100g) granulated white sugar
- [ ] 4 large eggs, room temperature
- [ ] 2 tsp vanilla extract
- [ ] ½ cup (120g) Biscoff spread (smooth)
- [ ] 1 cup (240ml) buttermilk, room temperature
For the Biscoff Buttercream:
- [ ] 1 ½ cups (340g) unsalted butter, softened
- [ ] 1 cup (250g) Biscoff spread (smooth)
- [ ] 3 ½ cups (440g) powdered sugar, sifted
- [ ] 3–4 tbsp heavy cream
- [ ] 1 tsp vanilla extract
- [ ] Pinch of salt (balance is everything)
For Decoration:
- [ ] ½ cup (125g) Biscoff spread, warmed (for the drip — the dramatic moment)
- [ ] 8–10 whole Biscoff cookies (for garnish on top)
- [ ] ½ cup crushed Biscoff cookies (for pressing into the sides — this step is wildly satisfying)
Recommended Tools

- Stand mixer or hand electric mixer — creaming butter by hand is a workout nobody signed up for
- Three 8-inch round cake pans — for even layers; one pan and multiple rounds works too but adds time
- Parchment paper — line those pans or you’ll be crying over a stuck cake
- Cooling rack — non-negotiable; frosting a warm cake is a beautiful disaster
- Offset spatula — for smooth, professional-looking frosting without losing your mind
- Bench scraper — optional but incredible for getting clean, smooth sides
- Piping bag + large star tip — for those gorgeous frosting swirls on top
- Sieve/sifter — for the powdered sugar; lumpy buttercream is a tragedy
- Microwave-safe bowl — for warming the Biscoff drip to a pourable consistency
Step-by-Step Instructions
1. Prep Your Pans and Preheat Preheat your oven to 350°F (175°C). Grease three 8-inch round cake pans, line the bottoms with parchment paper, then grease the paper too. Don’t skip this — you want your cake layers to release cleanly, not stay stuck and break your spirit.
2. Mix the Dry Ingredients In a medium bowl, whisk together the flour, baking powder, baking soda, cinnamon, and salt. Set it aside. This takes 30 seconds and prevents you from accidentally forgetting the baking powder later. Trust the process.
3. Cream the Butter and Sugars In your mixer bowl, beat the softened butter with both sugars on medium-high for a solid 4–5 minutes until the mixture is light, pale, and fluffy. This step builds the structure of your cake — don’t rush it. Add the Biscoff spread and beat for another minute.
4. Add Eggs and Vanilla Add the eggs one at a time, beating well after each addition. Scrape down the sides of the bowl as you go. Add the vanilla extract and mix until just combined. The batter will look gorgeous and smell incredible at this point — don’t eat it all.
5. Alternate the Dry Ingredients and Buttermilk With the mixer on low, add the flour mixture in three additions, alternating with the buttermilk in two additions. Start and end with flour. Mix until just combined — overmixing develops gluten and makes your cake tough. Stop the moment you don’t see dry streaks.
6. Bake the Cakes Divide the batter evenly between the three pans. Bake for 30–35 minutes, or until a toothpick inserted in the center comes out clean. Let the cakes cool in the pans for 15 minutes, then turn them out onto a wire rack to cool completely. Completely. Do not frost a warm cake. I’m begging you.
7. Make the Biscoff Buttercream Beat the softened butter on high for 3–4 minutes until pale and fluffy. Add the Biscoff spread and beat again. Gradually add sifted powdered sugar, mixing on low first (unless you want a powdered sugar snowstorm in your kitchen). Add heavy cream, vanilla, and a pinch of salt. Beat on high for 2–3 minutes until light, creamy, and utterly irresistible.
8. Assemble the Layers Place the first cake layer on your serving plate or cake board. Spread a generous layer of buttercream on top. Repeat with the second and third layers. Apply a thin crumb coat all over the cake, then refrigerate for 20 minutes. This seals in any loose crumbs before the final frosting layer.
9. Frost and Decorate Apply the final layer of buttercream smoothly with your offset spatula and bench scraper. Press crushed Biscoff cookies around the bottom sides of the cake for texture and drama. Warm the extra Biscoff spread in the microwave in 15-second intervals until pourable, then drizzle it around the top edges and let it drip down naturally. Pipe buttercream swirls on top and finish with whole Biscoff cookies. Step back and admire your work.
Nutrition Facts
| Serving Size | 1 slice (1/12 of cake) |
| Calories | 580 kcal |
| Total Fat | 34g |
| — Saturated Fat | 19g |
| — Trans Fat | 0.5g |
| Cholesterol | 115mg |
| Sodium | 210mg |
| Total Carbohydrates | 65g |
| — Dietary Fiber | 0.5g |
| — Total Sugars | 48g |
| Protein | 5g |
| Calcium | 60mg |
| Iron | 1.4mg |
Based on 12 servings. Values are estimates.
Recipe Variations
- Biscoff Chocolate Swirl Cake: Add ¼ cup of cocoa powder to half the batter and swirl it with the plain batter before baking. The chocolate-Biscoff combination is absolutely unhinged in the best possible way.
- Biscoff Cupcakes: Use this exact batter in a lined muffin tin, fill each cup ⅔ full, and bake at 350°F for 18–20 minutes. Top with the same buttercream and a half-cookie for an individually portioned version that’s perfect for parties.
- Biscoff Cheesecake Layer Cake: Replace the middle layer of buttercream with a no-bake Biscoff cheesecake filling (cream cheese + Biscoff spread + whipped cream). Layer it between the sponges and refrigerate overnight. Showstopper doesn’t even cover it.
Recommended Ways to Serve
- Room Temperature is King: Always serve this cake at room temperature — the buttercream softens to the perfect creamy consistency and the flavors open up beautifully. Pull it out of the fridge at least 30–45 minutes before serving.
- With a Hot Drink: A slice alongside a strong cup of coffee, chai, or spiced tea is basically a religious experience. The warm spice notes in the Biscoff sing against a hot drink.
- As a Dessert Centerpiece: Bring this to a birthday, a dinner party, or any gathering where you want to become everyone’s favorite person immediately. Set it on a cake stand and watch faces light up. It’s almost unfair.
Storing and Reheating Guidelines
- Room Temperature (short term): Store the frosted cake under a cake dome or in an airtight container at room temperature for up to 2 days in a cool environment. Any longer and the buttercream risks going off.
- Refrigerator: The cake keeps well in the fridge for up to 5 days in an airtight container. The sponge may firm up slightly when cold — always bring to room temperature before serving for the best texture.
- Freezer: Freeze unfrosted cake layers individually, wrapped tightly in plastic wrap and then foil, for up to 3 months. Thaw overnight in the fridge, bring to room temperature, then frost fresh. Frosted slices can also be frozen on a tray and then transferred to a container — thaw in the fridge overnight.
Common Mistakes to Avoid & Fixes
| ❌ Mistake | ✅ Fix |
|---|---|
| Using cold butter and eggs straight from the fridge | Cold ingredients don’t emulsify properly and your batter will look curdled and sad. Pull everything out at least an hour before you start. |
| Frosting a warm cake | The buttercream will melt, slide off, and you’ll cry. Cool the layers completely — all the way, not “mostly.” |
| Under-creaming the butter and sugar | Rushing this step means a dense, heavy cake. Commit to the full 4–5 minutes. Your patience will be rewarded. |
| Overmixing after adding flour | Gluten development = tough cake. Once the flour goes in, mix gently and stop the moment it comes together. |
| Skipping the crumb coat | Dive straight into the final frosting and you’ll drag crumbs everywhere. The crumb coat + 20-minute chill is what separates a messy cake from a clean one. |
| Drizzling cold Biscoff spread | Cold spread is thick and lumpy — it won’t drip elegantly. Warm it in 15-second bursts until it flows like a dream. |
Alternatives & Substitutions
- No buttermilk? Mix 1 cup of whole milk with 1 tablespoon of white vinegar or lemon juice. Let it sit for 5 minutes until curdled. Works identically and IMO is better than hunting down buttermilk at the store.
- Crunchy Biscoff instead of smooth? Go for it in the cake batter and buttercream — you’ll get small cookie bits throughout, which adds a lovely texture. Just be warned: it makes the drip topping chunkier, so use smooth for that part.
- Salted butter instead of unsalted? You can, just omit any added salt in the recipe. The slight saltiness actually enhances the Biscoff flavor — not a bad trade-off.
- No heavy cream for the buttercream? Whole milk works fine. The buttercream will be slightly less rich but still completely delicious. Add it a tablespoon at a time until you hit the right consistency.
- Gluten-free version? Swap the all-purpose flour for a good 1:1 gluten-free baking flour blend. The texture will be slightly different but still very good. Note that Biscoff spread is naturally gluten-free — the cookies are not, so skip the cookie decoration for a fully GF version.
FAQ (Frequently Asked Questions)
Q. Can I make this as a two-layer cake instead of three? Ans: Absolutely — just use two 9-inch pans instead and increase the bake time by 5 minutes or so. Check with a toothpick. You’ll have slightly thicker layers, which honestly isn’t a hardship.
Q. My buttercream is too sweet — what do I do? Ans: Add a pinch more salt and an extra tablespoon of heavy cream. The salt cuts through the sweetness beautifully, and the cream loosens the texture. You can also add a tiny squeeze of lemon juice — sounds weird, works brilliantly.
Q. Can I make the cake layers ahead of time? Ans: Yes, and actually this is a great idea. Bake the layers, wrap them tightly in plastic wrap, and store at room temperature for up to 2 days or freeze for up to 3 months. Day-of assembly is much less stressful when the baking is already done.
Q. Do I have to use three pans? Can I do this in one pan? Ans: You can use one pan and bake in batches, but make sure you re-grease and re-line the pan each time. Just note that batter sitting out while previous rounds bake can affect the rise. Three pans really is the move here.
Q. My Biscoff drip went everywhere and now my cake looks like a crime scene. Help. Ans: The spread was probably too warm and too thin. Let it cool for a minute or two before drizzling — you want it pourable but not watery. Do a test drip on the back of a spoon first. Also, applying the drip around the edges and letting gravity do the work gives you more control than pouring from the center.
Q. Can I use Lotus Biscoff cookie crumbles inside the cake layers too? Ans: Can you? You’re an adult. Should you? Absolutely yes. Sprinkle crushed cookies between the frosting layers for added crunch and texture. It’s a delightful move that no one will complain about.
Q. Is this cake suitable for kids? Ans: Unless your kids have nut or wheat allergies (check the Biscoff label for your region), this cake is a massive hit with children. No alcohol, no coffee — just pure caramelized, spiced cookie goodness. They will love you for it.
Latest Articles
-
Chocolate Cake Decoration: Make It Look Like You Actually Tried
-
-
🥬 Kitchen Vegetable Storage: Keeping Your Harvest Fresh as a Dew-Kissed Meadow
-

Air Fryer Baked Potatoes: Crispy Outside, Fluffy Inside, Zero Patience Required
-

Hashbrown Breakfast Casserole: The Breakfast That Does All the Heavy Lifting
-
🍳 Kitchen Decor Ideas: Transforming Your Cooking Space into a Warm, Functional Meadow
Final Thoughts
Here’s the thing about Biscoff cake — it’s the kind of bake that makes people stop mid-conversation to ask what they’re eating. It’s impressive without being complicated, indulgent without being overwrought, and it tastes like someone took a warm Belgian cookie and convinced it to become a celebration. Whether this is your first layer cake or your fiftieth, this recipe is going to deliver. Now go impress someone — or yourself — with your new culinary skills. You’ve absolutely earned it. And maybe hide a slice before guests arrive. No one will know.