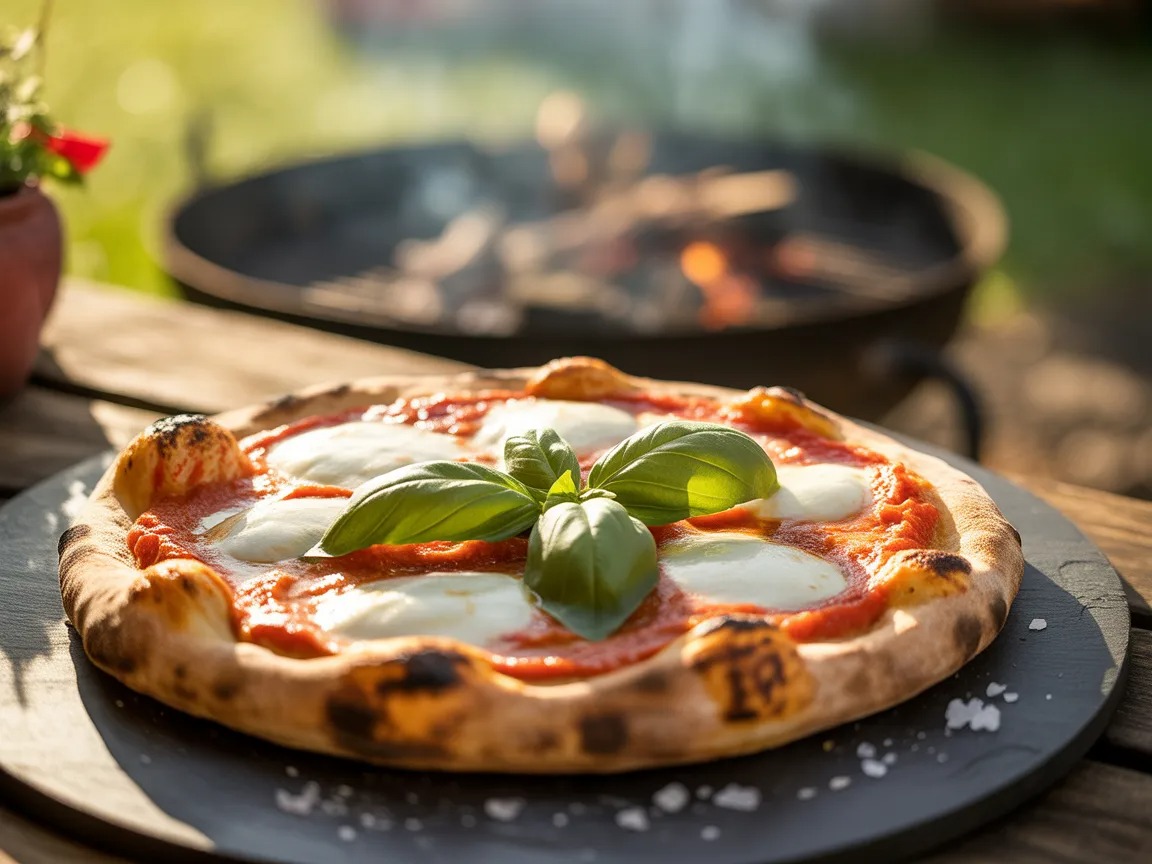
You’ve been making pizza in the oven like a perfectly reasonable person your entire life, and nobody blamed you for it. But then someone throws a pizza dough on a hot grill, the smoke curls up, the crust blisters and chars in all the right places, and suddenly every oven-baked pizza you’ve ever eaten feels like a rough draft. Grilled pizza is smoky, crispy-bottomed, chewy-centered, and genuinely spectacular — and it comes together faster than your oven even finishes preheating. Fire up the grill. Your pizza game is about to level up permanently.
Quick Look at the Recipe
| 🎓 Skill Level | ⏱️ Prep Time | 🍳 Cook Time | ⏰ Total Time |
|---|---|---|---|
| Intermediate | 20 minutes (+ 1 hr dough rise) | 8–10 minutes | 1 hour 35 minutes |
| 🍽️ Servings | 📋 Course | 🌍 Cuisine | 🔥 Calories |
|---|---|---|---|
| 4 (2 pizzas) | Main Course | Italian-American | ~520 kcal per serving |
Why This Recipe is Awesome
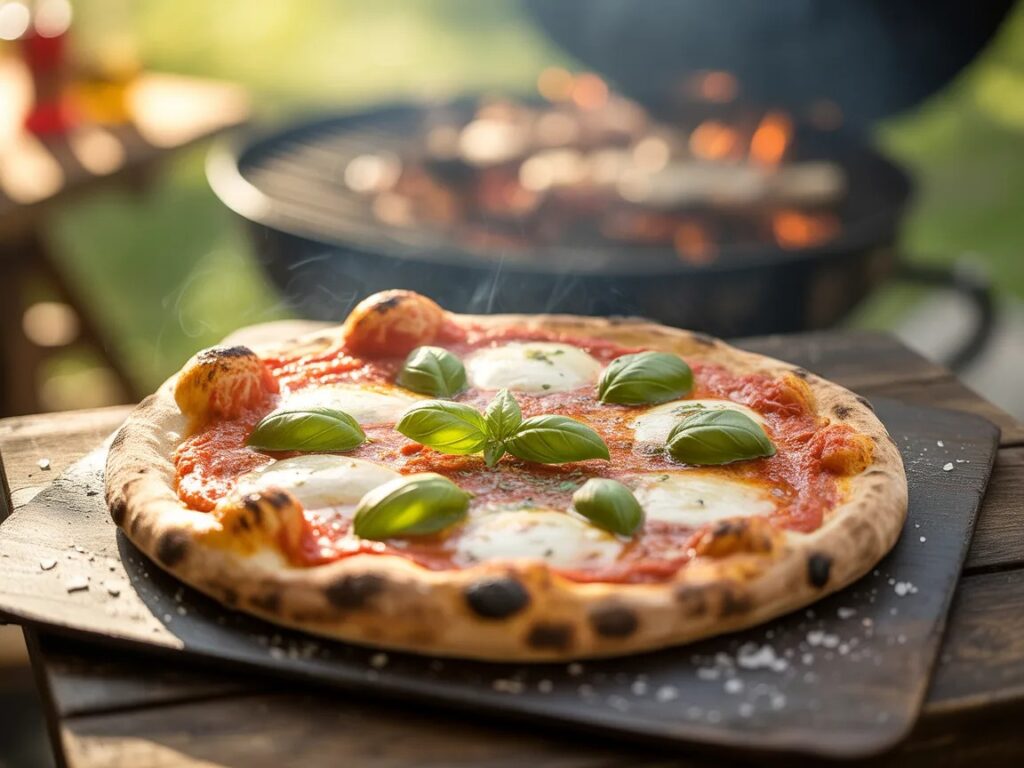
Here’s what happens when pizza dough hits a screaming hot grill — the bottom crust gets an immediate, dramatic sear that creates a crispiness no home oven can replicate without a wood-fired setup costing thousands of dollars. You get char blisters, smoke flavor, and a crunch-to-chew ratio that is frankly unfair to every delivery pizza you’ve ever ordered. The high direct heat cooks the crust in minutes while the lid traps heat to melt the cheese and finish the toppings simultaneously.
It’s also — and this is important — a genuinely fun cooking experience. Grilling pizza outdoors in summer while your friends watch skeptically, then seeing their faces when they take that first smoky, crispy bite? Priceless. The technique sounds more intimidating than it is. Once you do it once, you’ll wonder why you ever used an oven at all. It’s not quite idiot-proof, but it’s pretty close — and this guide covers every moment where things could go sideways.
Ingredients You’ll Need
For the Pizza Dough (makes 2 medium pizzas):
- [ ] 3 cups (375g) bread flour — higher protein than all-purpose; creates that chewy, stretchy crust with the right structure for grilling
- [ ] 2 ¼ tsp (7g) instant yeast — one standard packet; your dough’s best friend
- [ ] 1 tsp sugar — feeds the yeast and helps browning
- [ ] 1 tsp fine salt
- [ ] 1 tbsp olive oil — plus extra for brushing the dough before grilling
- [ ] 1 cup (240ml) warm water (110°F / 43°C) — too hot kills the yeast; too cool and nothing rises
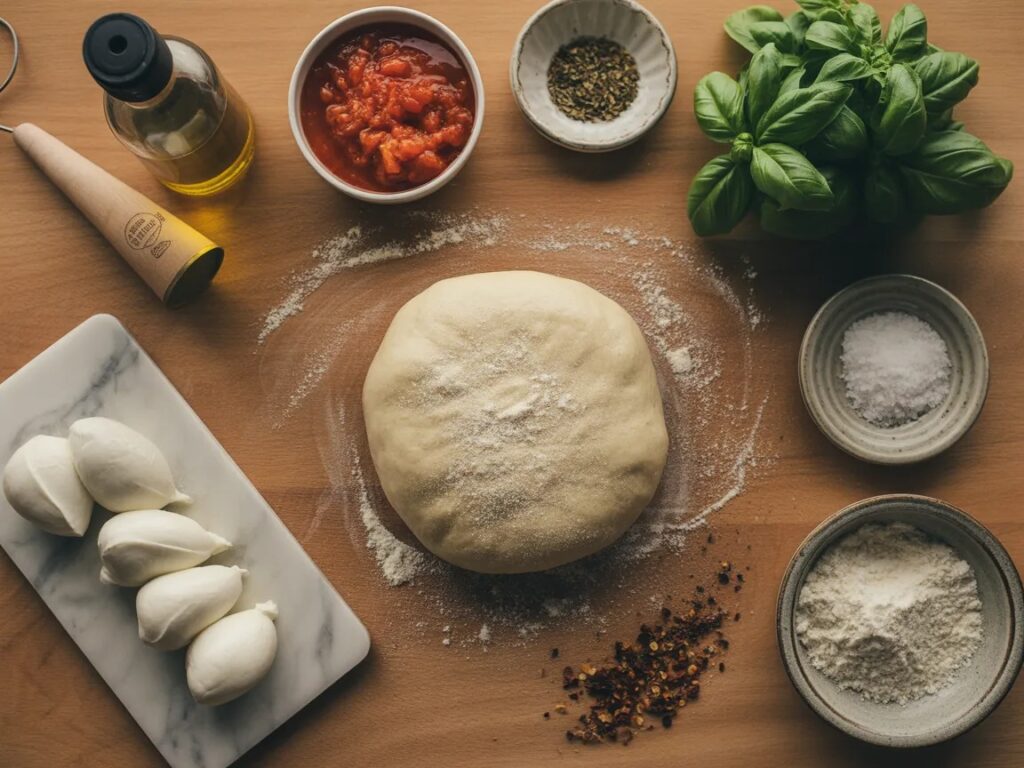
For the Classic Margherita Topping (or customize freely):
- [ ] ½ cup (120ml) crushed San Marzano tomatoes — or good quality pizza sauce; the sauce is thin, not thick — this isn’t a casserole
- [ ] 8 oz (225g) fresh mozzarella, torn into pieces — low-moisture works too but fresh melts more beautifully
- [ ] ¼ cup fresh basil leaves — added after grilling, not before; heat destroys fresh basil’s soul
- [ ] 2 tbsp good quality extra virgin olive oil — for finishing drizzle
- [ ] Flaky sea salt and black pepper — for finishing
- [ ] 1 tsp dried oregano — sprinkled over the sauce
Optional Toppings (go wild):
- [ ] Pepperoni, Italian sausage, prosciutto
- [ ] Caramelized onions, roasted garlic, fresh arugula (added post-grill)
- [ ] Chili flakes, parmesan, honey drizzle
Recommended Tools
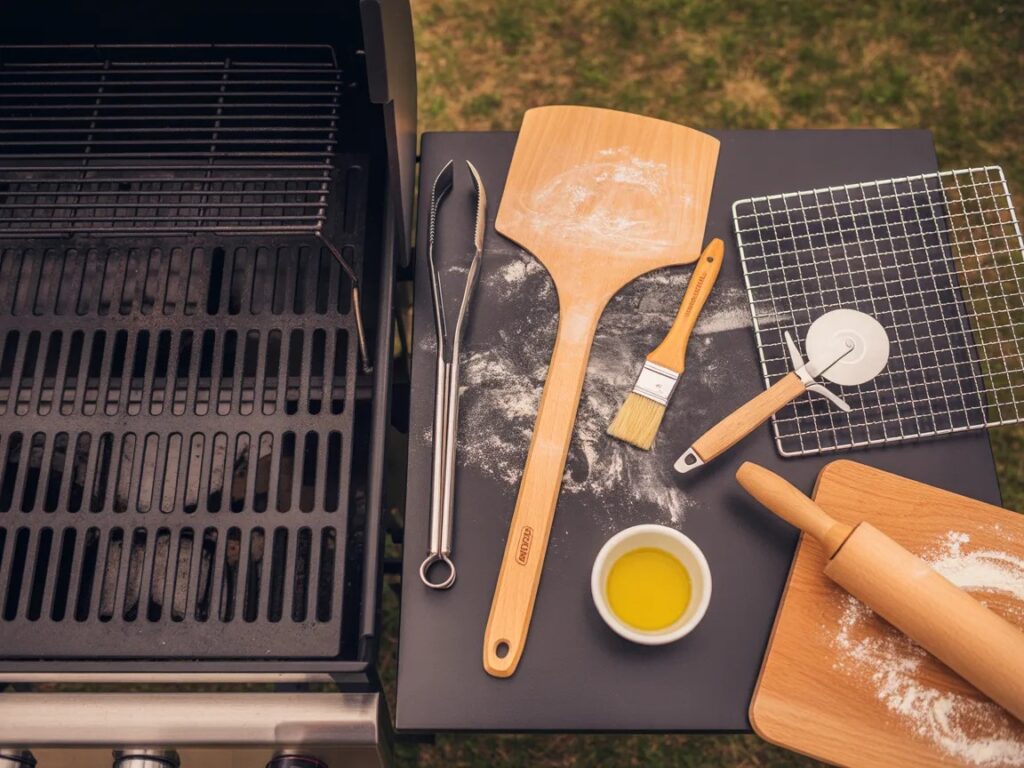
- Gas or charcoal grill — both work; charcoal adds more smoke flavor but gas is easier to control; either gets you there
- Pizza peel or large rimless baking sheet — for sliding the raw dough onto the grill without drama
- Long-handled tongs — for flipping the dough and adjusting position safely without singeing your arm hair
- Pastry brush — for oiling the dough surfaces before grilling
- Stand mixer with dough hook or large mixing bowl — for making the dough; hand kneading works too if you enjoy a forearm workout
- Rolling pin or your hands — for stretching and shaping the dough
- Wire rack — for resting the finished pizzas before cutting so the bottom stays crispy
- Pizza cutter or sharp chef’s knife — for slicing cleanly without dragging all the toppings
Step-by-Step Instructions
1. Make the Dough Combine warm water, sugar, and instant yeast in a large bowl or stand mixer bowl. Let it sit for 5 minutes until slightly foamy — this confirms your yeast is alive and working. Add bread flour, salt, and olive oil. Mix until a shaggy dough forms, then knead for 8–10 minutes until smooth, elastic, and slightly tacky but not sticky.
2. First Rise Shape the dough into a ball, place it in a lightly oiled bowl, cover with plastic wrap or a damp towel, and let it rise in a warm spot for 1 hour until doubled in size. If your kitchen is cold, place it in an oven with just the light on — the gentle warmth is perfect for proofing. Don’t rush this step; the rise builds flavor and structure.
3. Prep Your Toppings While the dough rises, get all your toppings ready and within reach. Grilled pizza moves fast — once that dough hits the grates, you have maybe 2 minutes before you need to flip it and start adding toppings. There is zero time to grate cheese or hunt for the basil while the grill is running. Prep everything, place it all at the grill station, then start cooking.
4. Preheat the Grill Preheat your grill to high heat — around 500–550°F (260–290°C). For charcoal, let the coals get ash-white and spread evenly. For gas, turn all burners to high with the lid closed for 10–15 minutes. A properly preheated grill is non-negotiable — a lukewarm grill produces pale, doughy, sad pizza instead of the blistered masterpiece you’re after.
5. Shape the Dough Divide the risen dough into two equal balls. On a lightly floured surface, stretch or roll each ball into a rough oval or round, about 10–12 inches wide and ¼ inch thick. Don’t aim for perfection — irregular shapes look rustic, beautiful, and intentional on a grilled pizza. Brush one side generously with olive oil.
6. Grill the First Side Carefully lift the dough by sliding a pizza peel or rimless baking sheet underneath it. In one confident motion, lay it oil-side-down onto the hot grill grates. Close the lid immediately and grill for 2–3 minutes until the bottom has grill marks and the dough is set and slightly puffed. Resist the urge to move it — let the grill do its work undisturbed.
7. Flip and Top Quickly Use long tongs to flip the dough grilled-side-up. Work fast now — you have about 60–90 seconds before the second side starts to char. Brush the grilled top surface with a thin layer of olive oil, then quickly spread the tomato sauce, scatter the torn mozzarella, and add any other toppings. Close the lid immediately.
8. Finish and Remove Grill for another 2–3 minutes with the lid closed until the cheese is fully melted, bubbling, and the bottom has beautiful char marks. Slide the finished pizza off onto a wire rack — never a cutting board directly, which traps steam and softens your beautiful crispy base. Add fresh basil, a drizzle of olive oil, flaky sea salt, and black pepper. Slice and serve immediately.
Nutrition Facts
| Serving Size | 2 slices (¼ of one pizza) |
| Calories | 520 kcal |
| Total Fat | 18g |
| — Saturated Fat | 7g |
| — Trans Fat | 0g |
| Cholesterol | 35mg |
| Sodium | 680mg |
| Total Carbohydrates | 68g |
| — Dietary Fiber | 3g |
| — Total Sugars | 3g |
| Protein | 22g |
| Calcium | 210mg |
| Iron | 3.2mg |
| Potassium | 290mg |
Based on classic Margherita topping. Values are estimates and vary with toppings.
Recipe Variations
- BBQ Chicken Grilled Pizza: Swap the tomato sauce for your favorite smoky BBQ sauce and top with shredded rotisserie chicken, thinly sliced red onion, and a mix of mozzarella and smoked gouda. Finish with fresh cilantro and an extra drizzle of BBQ sauce after pulling from the grill. The smoke from the grill amplifies the BBQ flavor in a way that is genuinely over the top.
- White Pizza with Garlic and Ricotta: Skip the tomato sauce entirely. Brush the grilled first side with garlic-infused olive oil, dollop ricotta across the surface, scatter shredded mozzarella, and add thin-sliced zucchini or asparagus. Finish with lemon zest and fresh herbs post-grill. Lighter, more elegant, and incredibly delicious.
- Spicy Italian Sausage and Peppers: Top with spicy Italian sausage crumbles (pre-cooked), roasted red peppers from a jar (drained and sliced), fresh mozzarella, and a heavy pinch of chili flakes. Finish with torn fresh basil. This version leans full comfort food and is basically the grilled pizza equivalent of a sausage and pepper sandwich in the best way.
Recommended Ways to Serve
- Straight Off the Grill as a Crowd Appetizer: Cut each pizza into small squares or strips rather than traditional wedges and serve immediately as an appetizer while guests are still gathered around the grill. The theatrical element of watching pizza come off a grill makes it taste even better — and the informal cut means everyone can grab a piece without ceremony.
- Full Dinner with a Simple Salad: Serve half a pizza per person alongside a crisp arugula salad dressed with lemon juice, olive oil, shaved parmesan, and black pepper. The peppery arugula cuts beautifully through the richness of the cheese and charred crust — it’s a complete, balanced meal that feels genuinely restaurant-worthy.
- Pizza Bar Party Setup: Grill the crusts ahead of time (first side only), then let guests customize their own toppings at a setup station before you finish them on the grill. It’s interactive, low-pressure, endlessly fun, and ensures everyone gets exactly what they want. IMO this is the perfect summer entertaining format.
Storing and Reheating Guidelines
- Refrigerator: Store leftover grilled pizza in an airtight container or wrapped in foil for up to 3 days. The crust will soften overnight but reheats back to crispiness well. Keep toppings and crust together — there’s no reason to separate them.
- Reheating for best results: Skip the microwave entirely — it makes grilled pizza crust rubbery and sad. Reheat slices in a dry skillet over medium heat with a lid on for 3–4 minutes. The base re-crisps on the pan while the lid traps steam to reheat the toppings. Alternatively, use the grill itself on low heat for 2–3 minutes — brilliant if it’s already going.
- Freezing unbaked dough: The pizza dough freezes beautifully. After the first rise, divide into balls, wrap tightly in plastic wrap, place in a zip-lock bag, and freeze for up to 3 months. Thaw overnight in the refrigerator, then bring to room temperature for 30–45 minutes before stretching and grilling. Having frozen dough balls ready is a weeknight game-changer.
Common Mistakes to Avoid & Fixes
| ❌ Mistake | ✅ Fix |
|---|---|
| Not preheating the grill hot enough | A cool grill means the dough sticks, doesn’t char, and bakes instead of grills. Get it to 500°F+ before anything goes on. High heat is the whole point. |
| Overloading with toppings | Too many toppings weigh down the dough, prevent the cheese from melting quickly, and make flipping chaos. Keep it light — less is genuinely more on grilled pizza. |
| Not oiling the dough before grilling | Unoiled dough sticks to the grates like it’s trying to become one with them. Brush both sides generously with olive oil before it goes anywhere near the grill. |
| Not having toppings ready before starting | Grilled pizza is a sprint, not a marathon. Once the dough is on the grill, you have 2–3 minutes before you need to flip and top. Not ready? Burnt crust. Prep everything first. |
| Cutting on a board immediately after grilling | Steam trapped under the crust on a solid surface softens your beautiful charred base. Always rest on a wire rack for 1–2 minutes before cutting. |
| Making the dough too thin in the center | Super-thin spots tear when you try to flip and drop toppings through the grates into the fire. Keep it at a uniform ¼ inch — thin but structurally sound. |
Alternatives & Substitutions
- Store-bought pizza dough: Completely valid, zero judgment. Most grocery stores sell fresh or refrigerated pizza dough in the bakery section. Bring it to room temperature for 30–45 minutes before stretching — cold dough tears and springs back stubbornly. FYI, Trader Joe’s dough is a crowd-favorite for grilled pizza nights.
- Gluten-free dough: Several good gluten-free pizza dough options exist at grocery stores. They’re slightly more delicate to handle on the grill — use a well-oiled grill and handle gently. The result is excellent for anyone avoiding gluten.
- No fresh mozzarella? Low-moisture shredded mozzarella melts faster and is more forgiving in the quick cook time of grilled pizza — actually a solid practical choice. Avoid fresh buffalo mozzarella which releases too much water and can make the crust soggy before the cheese properly melts.
- No San Marzano tomatoes? Any good quality crushed tomatoes work well — season them with a pinch of salt, dried oregano, and a tiny splash of olive oil. Avoid jarred pizza sauces that are too thick and sweet; thin and bright is the right profile for grilled pizza.
- Charcoal vs. gas grill: Charcoal adds genuine wood-smoke flavor that gas simply can’t replicate — if you have the choice, charcoal wins for flavor. Gas is more convenient and easier to temperature-control, making it a better option for beginners. Both produce excellent grilled pizza; the choice is about preference and practicality.
FAQ (Frequently Asked Questions)
Q. Won’t the dough fall through the grill grates? Ans: Not if the dough is the right thickness (¼ inch) and the grill grates are preheated properly. The dough sets almost immediately on contact with hot grates, creating a firm crust that supports itself perfectly. If it’s paper-thin or the grill isn’t hot enough, you could have issues — which is why both steps matter.
Q. Do I need a pizza stone for grilling? Ans: No — the whole point of grilling pizza is direct contact with the grates for that char and crisp. A pizza stone on a grill works but it removes the direct flame contact that makes grilled pizza special. Go grates-direct and enjoy the full effect.
Q. Can I grill pizza on a gas grill with multiple burners? Ans: Yes — and you can use a two-zone setup to your advantage. Sear the first side over direct high heat, then move the pizza to indirect heat after flipping and topping for a more gentle melt of the cheese without risk of burning the bottom. Great technique for first-timers.
Q. My dough keeps tearing when I stretch it. What’s happening? Ans: The dough is too cold or hasn’t rested enough. Cold dough is tight and elastic — it resists stretching and tears easily. Let it sit at room temperature for at least 30 minutes before shaping, and use gentle, gradual pressure rather than aggressive pulling. If it keeps springing back, cover it and rest for another 10 minutes before trying again.
Q. How do I prevent the dough from sticking to the grill? Ans: Three things — a properly preheated grill, a well-oiled dough surface, and clean grill grates. Brush the grates with oil right before the dough goes on using a folded paper towel held with tongs. Don’t try to move the dough for the first 2 minutes; it releases naturally once a crust forms on the bottom.
Q. Can I make grilled pizza on an indoor grill pan? Ans: Yes — a cast iron grill pan over high heat on the stovetop produces excellent results. You won’t get the smoke of an outdoor grill, but the char marks and crispy bottom are very good. Cover with a large lid or foil tent after topping to trap heat and melt the cheese. Works surprisingly well.
Q. What’s the best cheese for grilled pizza? Ans: Fresh mozzarella torn into pieces is the classic choice and melts beautifully in the short cook time. Low-moisture shredded mozzarella is more practical and arguably crispier. For extra flavor, a combination of mozzarella and provolone, or mozzarella and fontina, is outstanding. Avoid hard cheeses like aged parmesan as a primary cheese — they don’t melt, they just toast. Add parmesan as a finishing flourish after the pizza comes off the grill.
Latest Articles
-
Chocolate Cake Decoration: Make It Look Like You Actually Tried
-
-
🥬 Kitchen Vegetable Storage: Keeping Your Harvest Fresh as a Dew-Kissed Meadow
-
Air Fryer Baked Potatoes: Crispy Outside, Fluffy Inside, Zero Patience Required
-
Hashbrown Breakfast Casserole: The Breakfast That Does All the Heavy Lifting
-
🍳 Kitchen Decor Ideas: Transforming Your Cooking Space into a Warm, Functional Meadow
Final Thoughts
Grilled pizza is one of those cooking techniques that feels like a discovery the first time you do it — the kind of thing that makes you wonder why it took so long to try. The char, the smoke, the blistered crust, the speed — it all adds up to a pizza experience that’s genuinely different from anything an oven produces. And once you’ve got the method down, it becomes one of the most fun and impressive things you can make for anyone. Summer cookouts, backyard dinner parties, random Tuesday nights when you just want something spectacular — grilled pizza fits every occasion. Now go impress someone — or yourself — with your new culinary skills. You’ve absolutely earned it. And maybe make two pizzas. You’ll want seconds before the first one is even finished.