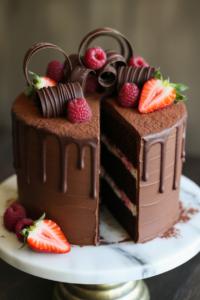
Chocolate cake. Whipped cream. Boozy cherries. If that sentence didn’t already make you close every other tab and run to the kitchen, I’m not sure we can be friends. Black Forest Cake is one of those legendary desserts that looks like it belongs in a fancy bakery window — but surprise, you can absolutely make it at home without a culinary degree or a dramatic breakdown. It’s dramatic in presentation, not in process. Well, mostly.
Whether you’re baking it for a birthday, a dinner party, or just a completely self-indulgent Tuesday night (no judgment, truly), this recipe walks you through every layer of this gorgeous, showstopping classic. Ready? Let’s build something beautiful.
Quick Look at the Recipe
| 🎯 Skill Level | ⏱️ Prep Time | 🔥 Cook Time | ⏰ Total Time |
|---|---|---|---|
| Intermediate | 40 minutes | 35 minutes | 3 hrs (with chilling) |
| 🍽️ Servings | 📋 Course | 🌍 Cuisine | 🔥 Calories |
|---|---|---|---|
| 12 slices | Dessert | German | ~520 kcal per slice |
Why This Recipe is Awesome
Let’s talk about why Black Forest Cake deserves a permanent spot in your baking rotation — besides the obvious fact that it tastes like a dream wrapped in chocolate shavings.
- It’s a full-on showstopper. Three layers of chocolate sponge, billowy whipped cream, and glossy cherries on top? People will think you took a class. You didn’t. That’s your secret.
- The flavors are unbeatable. Chocolate and cherries are basically soulmates. Add cream and a splash of Kirsch (cherry liqueur), and you’ve got a dessert that genuinely tastes like an occasion.
- It’s make-ahead friendly. This cake actually gets better after chilling overnight. You do most of the work the day before and just assemble before serving. Honestly, that’s the kind of recipe I can get behind.
- Completely customizable. Skip the alcohol for a family-friendly version, swap fresh cherries for canned — it adapts without complaining. IMO, that’s the mark of a great recipe.
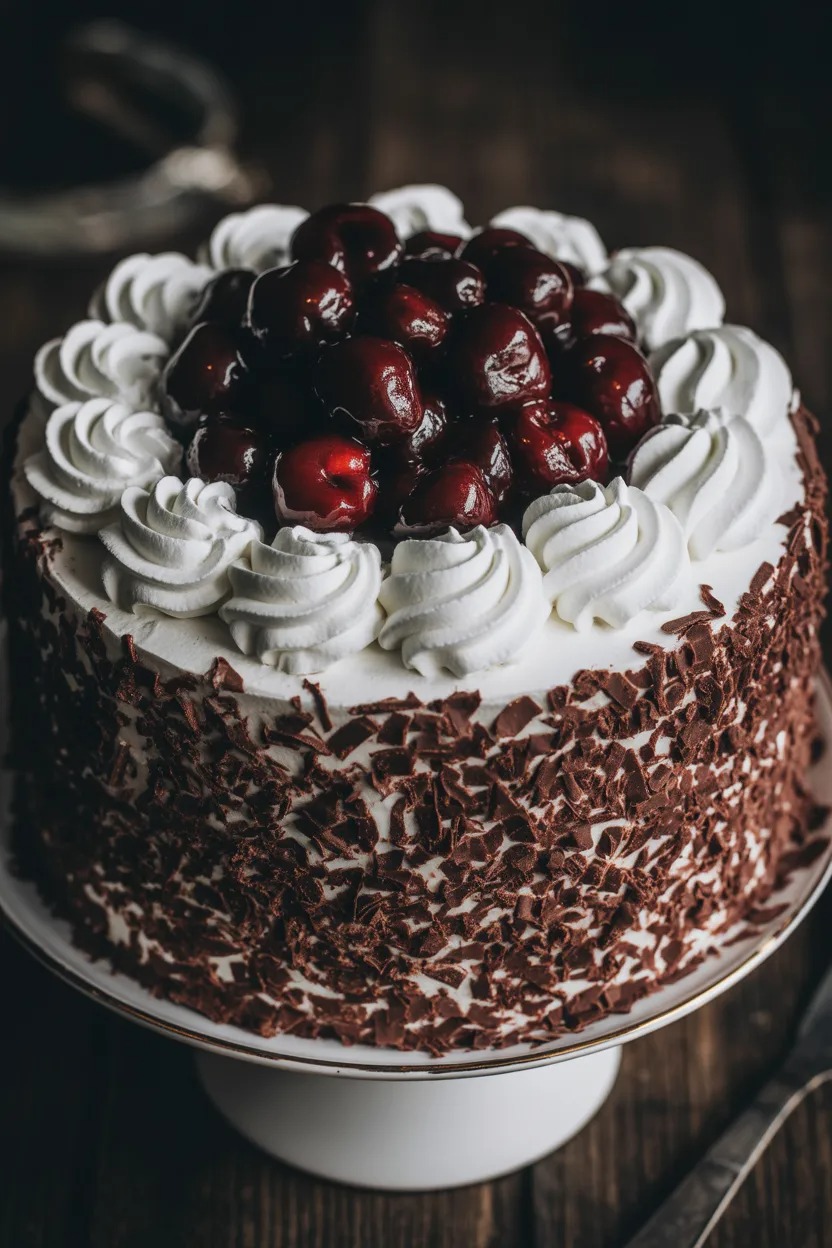
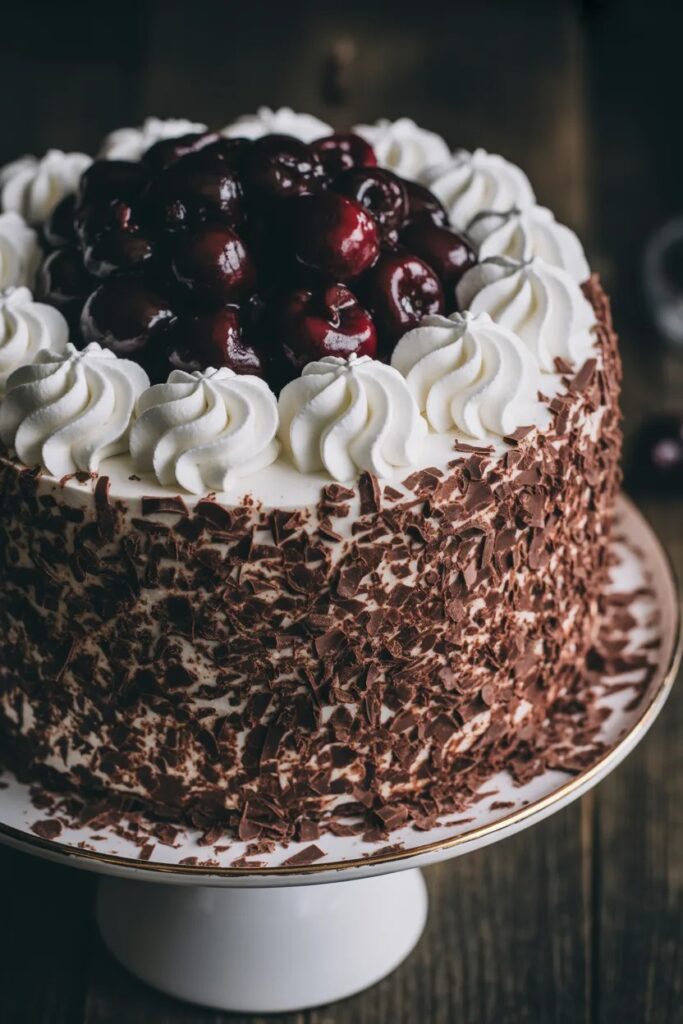
- It looks incredibly impressive. Even a slightly imperfect Black Forest Cake looks like you tried really hard. The chocolate shavings hide a multitude of sins. Trust.
Ingredients You’ll Need
Let’s break it down by component so nothing catches you off guard mid-bake.
For the Chocolate Sponge:
- ☐ 2 cups all-purpose flour — nothing fancy, just your regular flour
- ☐ 2 cups granulated sugar — the cake needs it, your waistline doesn’t, moving on
- ☐ ¾ cup unsweetened cocoa powder — good quality makes a real difference here
- ☐ 2 tsp baking soda
- ☐ 1 tsp baking powder
- ☐ 1 tsp salt
- ☐ 2 large eggs — room temperature, please
- ☐ 1 cup buttermilk — gives the sponge that soft, tender crumb
- ☐ 1 cup strong brewed coffee (cooled) — don’t panic, it just deepens the chocolate flavor
- ☐ ½ cup vegetable oil
- ☐ 2 tsp vanilla extract
For the Cherry Filling:
- ☐ 2 cans (14 oz each) pitted sour cherries — drained, but reserve the juice
- ☐ ⅓ cup granulated sugar
- ☐ 3 tbsp cornstarch
- ☐ 3–4 tbsp Kirsch (cherry liqueur) — optional but highly recommended, FYI
For the Whipped Cream Frosting:
- ☐ 3 cups heavy whipping cream (cold) — cold is non-negotiable
- ☐ ⅓ cup powdered sugar
- ☐ 1 tsp vanilla extract
For Decoration:
- ☐ Dark chocolate bar — for shaving/curling (or buy pre-made chocolate shavings if you’re working smarter, not harder)
- ☐ 12–15 fresh or maraschino cherries — for the top
Recommended Tools
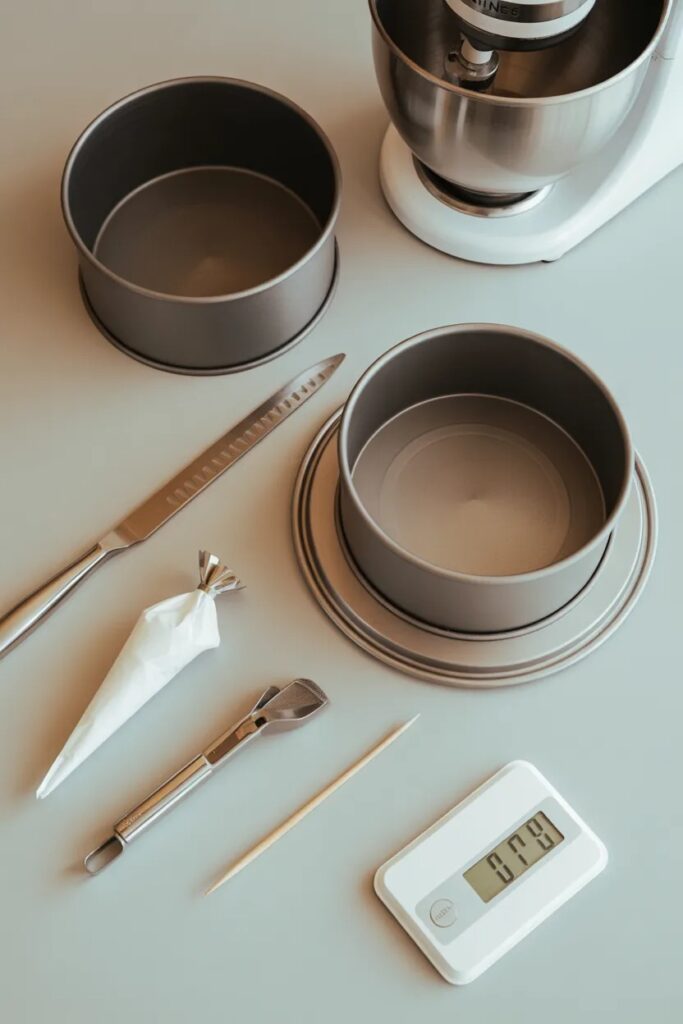
Don’t attempt this without the right gear. Here’s what you actually need:
- 🎂 Two 9-inch round cake pans — for baking the sponge layers (you’ll slice them into three)
- 🥣 Stand mixer or hand mixer — whipping cream by hand is a workout nobody signed up for
- ⚖️ Kitchen scale or measuring cups/spoons — baking is science, not vibes
- 🌡️ Toothpick or cake tester — to check doneness without guessing
- 🔪 Long serrated knife — for slicing cake layers evenly
- 🍰 Cake turntable (optional but glorious) — makes frosting so much smoother
- 🧴 Piping bag + star tip — for those beautiful whipped cream rosettes on top
- 🍫 Vegetable peeler — for creating chocolate curls/shavings like a professional
Step-by-Step Instructions
1. Preheat and prep your pans. Heat your oven to 350°F (175°C). Grease and flour both 9-inch round cake pans, then line the bottoms with parchment paper. This is the step most people skip — and then wonder why their cake sticks. Don’t be that person.
2. Mix the dry ingredients. In a large bowl, whisk together the flour, sugar, cocoa powder, baking soda, baking powder, and salt. Give it a good mix to make sure everything is evenly distributed before the wet ingredients go in.
3. Add the wet ingredients. Add the eggs, buttermilk, cooled coffee, vegetable oil, and vanilla extract to the dry mixture. Beat on medium speed for about 2 minutes until the batter is smooth. It’ll look quite thin — that’s totally normal and actually a good sign.
4. Bake the sponge layers. Divide the batter evenly between the two pans and bake for 30–35 minutes, or until a toothpick inserted into the center comes out clean. Let the cakes cool in the pans for 10 minutes, then turn them out onto wire racks to cool completely. Completely means completely — frosting a warm cake is a recipe for a sad, melted disaster.
5. Make the cherry filling. In a saucepan over medium heat, combine the drained cherry juice, sugar, and cornstarch. Stir constantly until it thickens — about 3–4 minutes. Remove from heat, stir in the cherries and Kirsch, and let it cool fully before using.
6. Whip the cream. Combine the cold heavy cream, powdered sugar, and vanilla in a chilled bowl. Beat on high speed until stiff peaks form. Don’t over-whip or you’ll end up with butter. Stop the moment it holds its shape firmly.
7. Slice the cake layers. Using your serrated knife, carefully slice each cooled cake horizontally in half — giving you four layers total. Work slowly and use a gentle sawing motion. If the layers are slightly uneven, nobody will know once the cream goes on.
8. Soak the layers (optional but amazing). Brush each cake layer with a little of the reserved cherry juice or extra Kirsch. This keeps the sponge moist and adds that signature Black Forest flavor in every single bite.
9. Assemble the cake. Place your first cake layer on a serving plate or cake board. Spread a generous layer of whipped cream, then spoon over a portion of cherry filling. Repeat with the next two layers. Place the final layer on top and cover the entire outside of the cake with whipped cream.
10. Decorate and chill. Press chocolate shavings onto the sides and top of the cake. Pipe whipped cream rosettes around the top edge and place a fresh cherry on each one. Refrigerate for at least 2 hours (overnight is even better) before slicing and serving.
Nutrition Facts
────────────────────────────────
       Nutrition Facts
────────────────────────────────
Serving Size: 1 slice (1/12 of cake)
Servings Per Recipe: 12
────────────────────────────────
Calories              520
────────────────────────────────
                        % Daily Value*
Total Fat              28g             36%
  Saturated Fat        15g             75%
  Trans Fat            0g
Cholesterol            95mg            32%
Sodium                 310mg           13%
Total Carbohydrates    63g             23%
  Dietary Fiber        3g              11%
  Total Sugars         44g
    Added Sugars       38g             76%
Protein                6g              12%
────────────────────────────────
Vitamin D              4%
Calcium                6%
Iron                   10%
Potassium              5%
────────────────────────────────
*Percent Daily Values based on a
2,000 calorie diet.
────────────────────────────────
Recipe Variations
- Alcohol-Free Version: Simply skip the Kirsch and soak the layers with cherry juice instead. You get all the cherry flavor without the booze — perfect for kids’ parties or anyone who just prefers it that way. Still absolutely delicious.
- Mini Black Forest Cupcakes: Use the same chocolate sponge batter to make cupcakes, core out the center of each one, fill with cherry compote, and top with whipped cream and a cherry. All the flavors, individually portioned, way easier to serve at a party.
- White Chocolate Black Forest Cake: Swap the chocolate shavings and sponge for a white chocolate version — use a white vanilla sponge and white chocolate curls on top. The cherry and cream filling stays the same. It looks stunning and tastes completely different — in the best way.
Recommended Ways to Serve
- Chilled and fresh on the day of assembly: Slice it straight from the fridge after that 2-hour chill time, with a dusting of extra cocoa powder and a cherry on the side. Simple, classic, perfect.
- With a drizzle of warm chocolate sauce: Serve each slice with a little warm dark chocolate ganache drizzled over the top. It adds a luxurious richness and makes an already impressive cake look even more restaurant-worthy.
- Paired with vanilla ice cream: A small scoop of good vanilla ice cream alongside a cold slice of Black Forest Cake is a combination so good it should probably be illegal.
Storing and Reheating Guidelines
- Refrigerator: Keep the assembled cake covered loosely with plastic wrap or under a cake dome in the fridge for up to 3–4 days. The whipped cream stays fresh and the flavors actually deepen over time — day two of this cake is genuinely better than day one.
- Freezing individual slices: Wrap slices tightly in plastic wrap and then in foil before freezing. They’ll keep well for up to 1 month. Thaw overnight in the fridge — don’t rush it at room temperature or the cream weeps and the whole thing gets sad.
- Reheating: This is a cold dessert — do not microwave it. Just don’t. Let refrigerated slices sit at room temperature for about 10 minutes before serving if you want to take the chill off. That’s all the “reheating” this cake ever needs.
Common Mistakes to Avoid & Fixes
| ❌ Mistake | ✅ Fix |
|---|---|
| Frosting a warm cake | Let it cool completely before touching it with cream. Warm cake + whipped cream = a sad, melty puddle. Patience is a virtue here. |
| Over-whipping the cream | Watch it closely as it thickens. The moment it holds stiff peaks, stop. Thirty seconds too long and you’re making butter. Tasty, but not what we’re going for. |
| Skipping the cherry soak | Soaking the layers with cherry juice or Kirsch is what keeps this cake from tasting dry. Don’t skip it — it takes 2 minutes and makes a massive difference. |
| Cutting layers while the cake is warm | A warm cake crumbles. Cool it fully, and if you have time, refrigerate it for 30 minutes before slicing layers. Cold cake cuts clean. |
| Using warm cherry filling on the cream | Hot filling melts whipped cream instantly. Always cool your cherry compote completely before it goes anywhere near the cake. |
| Being stingy with the chocolate shavings | More is more. Pile them on the sides and top. They look incredible AND hide any imperfect frosting. Double win. |
Alternatives & Substitutions
- No buttermilk? Mix 1 cup of regular milk with 1 tbsp of white vinegar or lemon juice, let it sit for 5 minutes, and boom — DIY buttermilk. Works perfectly every time.
- No Kirsch? Use cherry brandy, amaretto, or simply leave it out entirely and use cherry juice. The cake won’t suffer. Much.
- Canned vs. fresh cherries? Fresh sour cherries are ideal when in season, but canned work beautifully and honestly require way less effort. IMO, canned is the move for a weeknight bake.
- Vegetable oil substitution? Melted coconut oil or melted butter both work in the sponge. Butter adds a slightly richer flavor; coconut oil adds a very subtle tropical note that’s actually kind of nice.
- No piping bag? Use a zip-lock bag with a small corner snipped off. It’s not fancy, but it absolutely gets the job done for rosettes.
- Dairy-free version? Use coconut cream instead of heavy whipping cream (chill the can overnight first and whip only the solid part). It whips up surprisingly well and tastes great with the cherries and chocolate.
FAQ (Frequently Asked Questions)
Q. Do I have to use alcohol in a Black Forest Cake? Ans: Absolutely not. The Kirsch adds authentic flavor, but it’s totally optional. Cherry juice soaks the layers just as well and keeps it family-friendly. The cake doesn’t need the booze — it’s already impressive enough on its own.
Q. Can I use a box mix for the chocolate sponge? Ans: Can you? Yes. Should you? Look, no judgment — a good chocolate box mix actually bakes up a decent sponge. Just doctor it up with a shot of espresso or strong coffee in the batter to deepen the chocolate flavor. Nobody needs to know.
Q. Why does my whipped cream keep going flat? Ans: Cold is your best friend here. Make sure your cream, bowl, and even your beaters are cold before you start whipping. Warm cream simply won’t hold its structure. Pop everything in the fridge for 15 minutes before whipping if your kitchen is warm.
Q. How far in advance can I make this cake? Ans: You can bake the sponge layers up to 2 days ahead and keep them wrapped at room temperature. The cherry filling can be made a day ahead. Assemble the full cake the day before serving and refrigerate — it actually tastes better the next day once everything melds together.
Q. My cake layers came out domed — is that a problem? Ans: Super common and totally fixable. Use your serrated knife to trim the domed tops off each layer before assembling. This gives you flat, even layers that stack cleanly and look way more polished. Those trimmings? Chef’s snack. You earned it.
Q. Can I make this as a sheet cake instead of a layered round cake? Ans: Yes! Bake the batter in a 9×13 inch pan, let it cool, and then just layer the cherry filling and whipped cream on top like a sheet cake. It won’t look as dramatic, but it’s way easier to slice and serve for a crowd.
Q. What’s the difference between Black Forest Cake and regular chocolate cake? Ans: Great question. Regular chocolate cake is all about the chocolate. Black Forest Cake layers in tart cherries, lightly boozy soaking liquid, and whipped cream — all of which cut through the richness and give it that distinctive, complex flavor profile. One is a cake. The other is an experience.
Latest Articles
-
Chocolate Cake Decoration: Make It Look Like You Actually Tried
-

-

🥬 Kitchen Vegetable Storage: Keeping Your Harvest Fresh as a Dew-Kissed Meadow
-

Air Fryer Baked Potatoes: Crispy Outside, Fluffy Inside, Zero Patience Required
-

Hashbrown Breakfast Casserole: The Breakfast That Does All the Heavy Lifting
-
🍳 Kitchen Decor Ideas: Transforming Your Cooking Space into a Warm, Functional Meadow
Final Thoughts
Here’s the thing about Black Forest Cake — it looks like it should be hard. The layers, the cream, the cherries artfully piled on top. But once you’ve done it, you’ll realize it’s really just chocolate cake with great accessories. And now you know how to make it from scratch, like an actual, legitimate baker.
Serve it at your next gathering and watch people’s eyes go wide. Or make it on a random weekend just because you can. Either way, you’ve added one of the greatest desserts in the world to your permanent skill set, and that’s genuinely worth celebrating.
Now go frost that final layer, pile on those chocolate shavings like you mean it, and enjoy every single bite. You absolutely earned this one. 🍰🍒