You didn’t sign up for a week-long baking course. You just want to make something that looks absolutely stunning, tastes like a dream, and gets you at least fifteen compliments at the table. Enter: the flower cake. It’s the kind of cake that makes people gasp a little, tilt their head, and go, “Wait — you made this?” Yes. Yes, you did. And it’s way less complicated than it looks, we promise.
Quick Look at the Recipe
| 🎯 Skill Level | ⏱️ Prep Time | 🔥 Cook Time | ⏰ Total Time |
|---|---|---|---|
| Intermediate | 45 minutes | 35 minutes | ~2.5 hours (with cooling) |
| 🍽️ Servings | 📋 Course | 🌍 Cuisine | 🔥 Calories |
|---|---|---|---|
| 10–12 slices | Dessert | American / Contemporary | ~480 kcal |
Why This Recipe is Awesome
Let’s talk about why the flower cake deserves a permanent spot in your baking rotation:
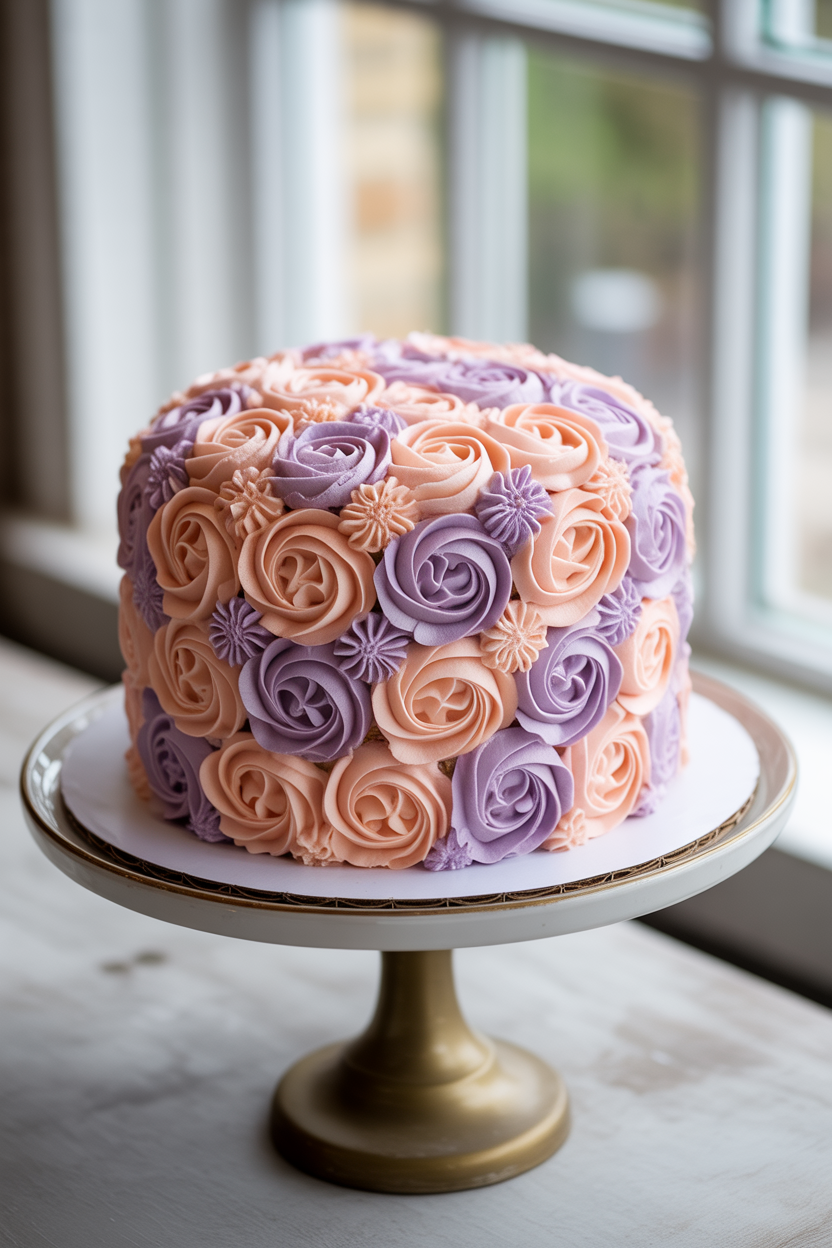
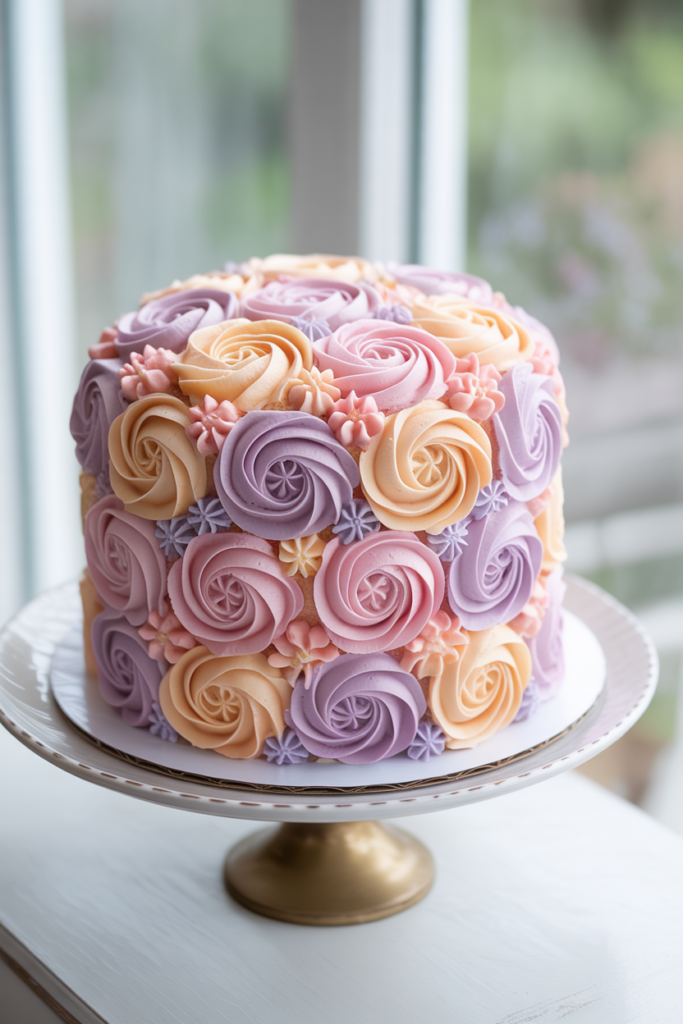
- It looks like it took professional training — it didn’t. With a piping bag and a petal tip, you can create buttery rosette and petal designs that genuinely look like a bouquet landed on top of your cake. No art degree required.
- It’s completely customizable. Want a pastel spring vibe? Go pink and lavender. Moody and dramatic? Deep burgundy and forest green. The flowers follow whatever color story you’re telling.
- The flavor is classic and crowd-pleasing. A fluffy vanilla sponge layered with silky buttercream — it’s the kind of cake everyone at the table will love, even the picky ones.
- It works for literally any occasion. Birthday, anniversary, baby shower, “I just felt like baking” Saturday — this cake fits everywhere.
- It photographs like a dream. IMO, this might be the most Instagram-worthy thing you’ll ever pull out of your kitchen.
Ingredients You’ll Need
For the Vanilla Sponge Cake:
- [ ] 2½ cups (310g) all-purpose flour — the trusty base; nothing fancy here
- [ ] 2½ tsp baking powder — the lift crew
- [ ] ½ tsp salt — because balance is everything
- [ ] 1 cup (225g) unsalted butter, softened — real butter, always; your cake will thank you
- [ ] 2 cups (400g) granulated sugar — sweet, sweet joy
- [ ] 4 large eggs, room temperature — cold eggs = sad, deflated cake
- [ ] 1 tbsp pure vanilla extract — the good stuff, not the imitation kind
- [ ] 1 cup (240ml) whole milk, room temperature — full fat for a moist, tender crumb
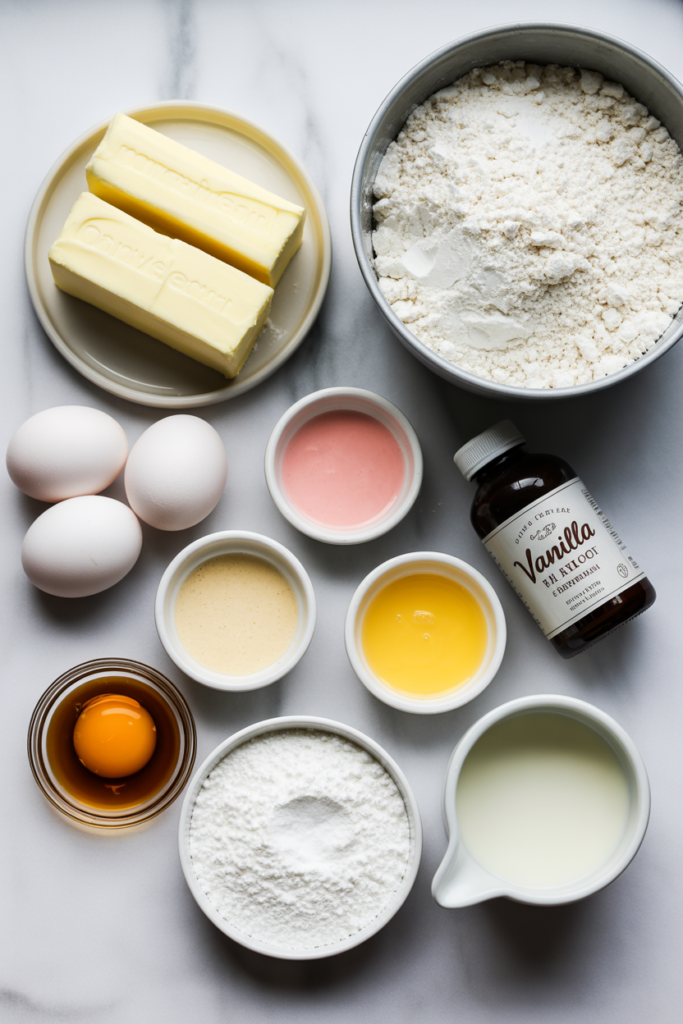
For the Buttercream Frosting:
- [ ] 2 cups (450g) unsalted butter, softened — yes, that much; it’s frosting, not a health food
- [ ] 6–7 cups (720–840g) powdered sugar, sifted — sift it, or lumpy frosting will haunt you
- [ ] 4–5 tbsp heavy cream — for that smooth, pipeable consistency
- [ ] 2 tsp vanilla extract
- [ ] Pinch of salt
- [ ] Gel food coloring — 2 to 3 colors of your choice; gel colors are more vivid and won’t thin the frosting
Recommended Tools
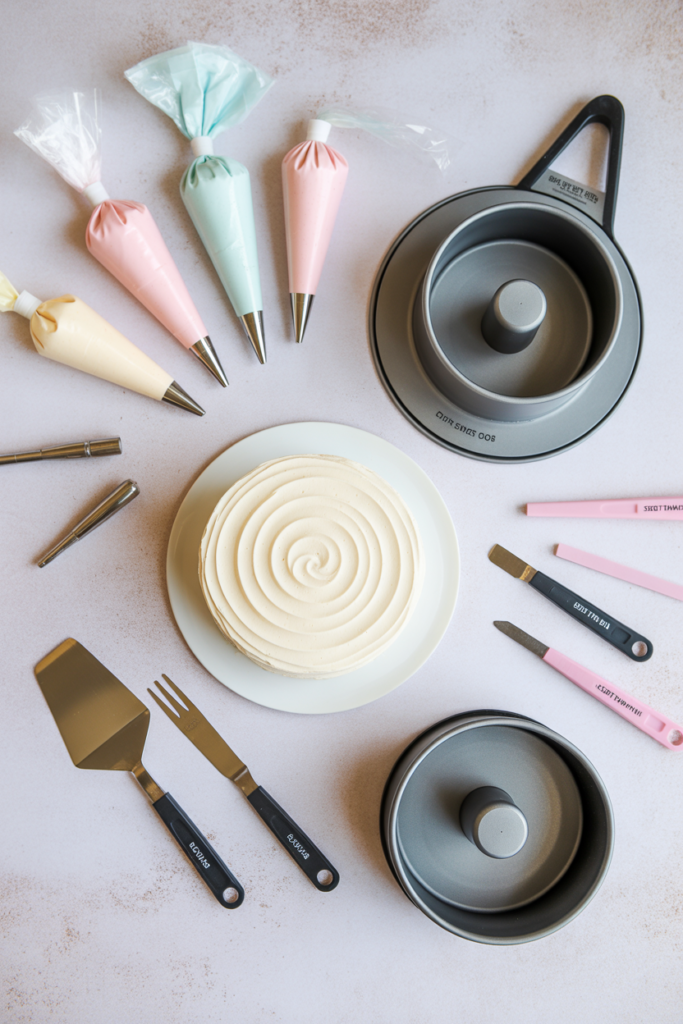
These are the non-negotiables:
- Two 8-inch round cake pans — for baking even layers like a professional
- Stand mixer or hand mixer — because creaming butter by hand is a full workout nobody asked for
- Piping bags — at least 3–4, one per color
- Petal tip (Wilton 104 or 125) and star tip (1M or 2D) — these two tips create most of the flower designs
- Offset spatula — essential for smoothing frosting between layers and on the outside
- Cake turntable — not mandatory but genuinely life-changing for decorating; your arms will thank you
- Bench scraper — for getting those clean, smooth sides
- Cooling rack — let the cake breathe before you frost it; patience is a virtue
- Toothpicks — for swirling colors in the frosting bag for a multi-tone effect
Step-by-Step Instructions
- Preheat your oven to 350°F (175°C) and grease both 8-inch cake pans. Line the bottoms with parchment paper circles — this saves you from the nightmare of cakes that stick and break.
- Whisk together flour, baking powder, and salt in a bowl and set aside. In your mixer, beat the softened butter and sugar on medium-high for 4–5 minutes until the mixture is pale, fluffy, and looks almost mousse-like. This step matters — don’t rush it.
- Add eggs one at a time, beating well after each one. Mix in the vanilla. Scrape down the sides of the bowl as you go so everything incorporates evenly.
- Alternate adding the flour mixture and milk — start and end with flour (flour → milk → flour → milk → flour). Mix on low just until combined each time. Do not overmix or your cake will turn dense and rubbery, and that’s a heartbreak nobody needs.
- Divide the batter evenly between the two pans and bake for 30–35 minutes, until a toothpick inserted in the center comes out clean. Let them cool in the pans for 10 minutes, then transfer to a cooling rack. Cool completely before frosting — at least 1 hour.
- Make the buttercream: Beat softened butter on high for 3–4 minutes until it’s pale and fluffy. Add sifted powdered sugar one cup at a time on low speed. Add cream, vanilla, and salt, then beat on high for another 2 minutes until smooth and airy.
- Divide the buttercream into separate bowls and tint each with gel food coloring. Load different colors into separate piping bags fitted with your petal or star tips.
- Assemble the cake: Place the first layer on your turntable. Spread an even layer of plain or lightly tinted buttercream on top. Place the second layer on, then apply a thin crumb coat all over the outside. Refrigerate for 20–30 minutes to set.
- Pipe your flowers: Starting from the bottom edge and working upward, pipe rosettes, petals, and swirls all over the cake. Mix your tips and colors to create variety. Work in sections and overlap petals slightly so there are no gaps. Fill smaller spaces with small star dots or leaf swirls.
- Step back, admire your work, and try not to eat the whole thing before it reaches the table.
Nutrition Facts
╔══════════════════════════════════════╗
║           Nutrition Facts            ║
║   Serving Size: 1 slice (1/12 cake)  ║
╠══════════════════════════════════════╣
║ Calories                  ~480       ║
╠══════════════════════════════════════╣
║ Total Fat                  26g  33%  ║
║   Saturated Fat            16g  80%  ║
║   Trans Fat                 0g       ║
║ Cholesterol               115mg 38%  ║
║ Sodium                    160mg  7%  ║
║ Total Carbohydrate          59g  21%  ║
║   Dietary Fiber              0g   1%  ║
║   Total Sugars              44g       ║
║ Protein                     4g       ║
╠══════════════════════════════════════╣
║ Vitamin A                   18%       ║
║ Calcium                      6%       ║
║ Iron                         6%       ║
╚══════════════════════════════════════╝
* % Daily Values based on a 2,000 calorie diet
Recipe Variations
- Lemon Flower Cake: Swap vanilla extract for lemon extract in both the sponge and buttercream, and add 2 tsp of lemon zest to the batter. Frost with pale yellow and white buttercream flowers for a fresh, sunny vibe.
- Chocolate Sponge Base: Replace ½ cup of flour with unsweetened cocoa powder for a rich chocolate cake underneath those beautiful buttercream blooms. Dark cake + pastel flowers = a seriously dramatic contrast.
- Strawberry Buttercream Flowers: Add 2 tbsp of freeze-dried strawberry powder to a portion of your buttercream for a naturally pink, fruity frosting that tastes as gorgeous as it looks.
Recommended Ways to Serve
- At room temperature — take it out of the fridge 30–45 minutes before serving so the buttercream softens and the flavors fully open up; cold buttercream is firm and waxy, and that’s not the vibe
- With fresh berries on the side — a little bowl of strawberries or raspberries next to each slice adds freshness and cuts through the richness of the frosting
- As a centerpiece first, dessert second — place it on a cake stand in the middle of the table and let people ooh and aah before you slice into it; the reveal is half the experience
Storing and Reheating Guidelines
- Room temperature: Cover the cake loosely and store at room temp for up to 2 days — the buttercream acts as a seal that keeps the sponge moist and fresh.
- Refrigerator: Store in an airtight container or cake box in the fridge for up to 5 days. Always bring to room temperature before serving — about 30–45 minutes on the counter.
- Freezing: You can freeze unfrosted cake layers wrapped tightly in plastic wrap for up to 2 months. Thaw overnight in the fridge, then decorate fresh. Freezing a fully decorated flower cake is technically possible but risky — those beautiful piped flowers can weep or crack when thawing.
Common Mistakes to Avoid & Fixes
| ❌ Mistake | ✅ Fix |
|---|---|
| Frosting a warm cake — the buttercream melts into a sad, drippy mess | Cool the cake completely — at least 1 hour on a rack, no shortcuts |
| Skipping the crumb coat — loose crumbs get trapped in your flower piping and it looks chaotic | Always crumb coat and refrigerate for 20–30 minutes before the final decoration layer |
| Buttercream too soft to pipe — flowers collapse and lose their shape | Pop the frosting in the fridge for 10–15 minutes to firm it up before piping |
| Using liquid food coloring — it thins the frosting and makes colors muddy | Always use gel food coloring; a little goes a long way and colors stay vivid |
| Overmixing the batter — develops too much gluten and gives you a dense, rubbery cake | Mix just until combined once the flour goes in; stop as soon as it looks smooth |
| Piping too far from the cake surface — flowers lose definition and look blobby | Hold your piping tip close to the surface — almost touching — for clean, defined petals |
| Using one tip for everything — the design ends up flat and repetitive | Mix petal tips, star tips, and round tips to add dimension and variety to the floral design |
Alternatives & Substitutions
- Whole milk → buttermilk: Swap in buttermilk for a slightly tangier, more tender crumb. It’s genuinely one of the best upgrades you can make to a vanilla cake batter.
- All-purpose flour → cake flour: Cake flour has lower protein content and produces an even softer, more delicate crumb. FYI, it’s worth keeping a bag around if you bake often.
- Buttercream → whipped cream frosting: Lighter and less sweet, but harder to pipe into defined flower shapes. Works great in warmer climates if buttercream is melting on you.
- Unsalted butter → salted butter: You can use salted butter in a pinch — just omit the added salt in the recipe. The flavor is slightly different but still good.
- Vanilla extract → almond extract: Use half the amount (almond extract is powerful) for a floral, marzipan-like flavor that pairs beautifully with the flower theme. Very on-brand for this cake.
- Gel coloring → natural coloring: Beet powder for pink, matcha for green, butterfly pea powder for blue — natural pigments are beautiful and trendy. Just know the shades will be more muted than gel colors.
FAQ (Frequently Asked Questions)
Q. Do I need a piping bag to make this cake look good? Ans: Technically you can use a zip-lock bag with the corner snipped off, but honestly — invest in a proper piping bag and a couple of tips. They’re cheap, reusable, and the difference in control is enormous. Your flowers will actually look like flowers.
Q. Can I make the cake layers ahead of time? Ans: Absolutely yes. Bake and cool the layers, wrap them tightly in plastic wrap, and refrigerate for up to 2 days or freeze for up to 2 months. Day-of decorating is so much more fun when the baking stress is already done.
Q. My buttercream looks greasy and separated — what happened? Ans: The butter was probably too warm. Pop the whole bowl in the fridge for 10–15 minutes, then beat it again. It’ll come back together. Buttercream is dramatic but forgiving.
Q. Can I use store-bought frosting for the flowers? Ans: You can, but canned frosting is too soft and sweet to hold piped flower shapes — they’ll droop and lose definition almost immediately. Homemade buttercream is the move here, and it genuinely takes less than 10 minutes to make.
Q. How do I get two colors in one piping bag? Ans: Lay a strip of one color along one side of the bag and another color along the other side before loading. When you pipe, the two colors swirl together for a gorgeous two-tone flower effect. It looks fancy but takes about 30 seconds to set up.
Q. What if my cake layers come out domed on top? Ans: Totally normal. Use a long serrated knife to level them off before assembling — just slice off the dome so you have a flat, even surface. Eat the scraps. Chef’s treat.
Q. Can I make this as cupcakes instead? Ans: 100% yes. Same batter, same buttercream, just pipe one large rosette flower on top of each cupcake. Bake at 350°F for 18–20 minutes. They’re adorable and a lot easier to serve at a party.
Final Thoughts
Look at you — you just learned how to make a flower cake that honestly belongs in a bakery window. This is the kind of recipe that pays off every single time you make it: people are wowed, it tastes incredible, and you get to feel like a proper pastry artist for the rest of the day.
Don’t stress if your first attempt isn’t magazine-perfect. Piping flowers is a skill that gets better every time you do it, and even an “imperfect” flower cake looks a hundred times more impressive than anything you’d pull from a box. The beauty of handmade is that it’s never supposed to be flawless — it’s supposed to look like someone who cares made it. And you clearly do.
Now go find an occasion to bake this — or just make one for yourself on a Tuesday. You’ve absolutely earned it. 🌸