So you baked a chocolate cake. Good. Maybe it came out perfectly, maybe it leaned slightly to one side—honestly doesn’t matter, because decoration is about to save everything. A beautifully decorated cake makes people forget all about what happened in the oven. It’s basically the makeup of the baking world, and once you learn a few solid techniques, you’ll turn out cakes that make people genuinely wonder if you took a class somewhere. You didn’t. You read this article. Same difference, and nobody needs to know.
Quick Look at the Recipe
| 🎯 Skill Level | ⏱️ Prep Time | 🔥 Cook Time | ⏰ Total Time |
|---|---|---|---|
| Beginner–Intermediate | 30 minutes | 0 minutes (decoration only) | ~45 minutes |
| 🍽️ Servings | 📋 Course | 🌍 Cuisine | 🔥 Calories |
|---|---|---|---|
| 12 slices | Dessert | International | ~420 per slice |
Why This Recipe Is Awesome
Here’s the thing about cake decoration—it sounds way more intimidating than it actually is. You don’t need a pastry degree, a spinning cake turntable imported from Paris, or the hands of a surgeon. You need a few good tools, solid techniques, and the willingness to commit to the process. That’s it.
What makes this guide genuinely great is that it covers everything from a silky chocolate ganache drip to a smooth buttercream finish, chocolate shards, and simple piping—all using approachable techniques that beginners can actually execute. Will your first cake look exactly like the ones on Pinterest? Probably not. Will it look impressive enough that someone at the table says “did you make this?”—absolutely yes, and that moment is worth everything.
Also: decorating a cake is quietly therapeutic. Smoothing frosting, drizzling ganache, placing little chocolate curls with intention—it’s genuinely calming once you stop panicking and just go with it. IMO, cake decorating is the arts and crafts of the food world, and everyone deserves to enjoy it.
Ingredients You’ll Need
For the Chocolate Buttercream Frosting:
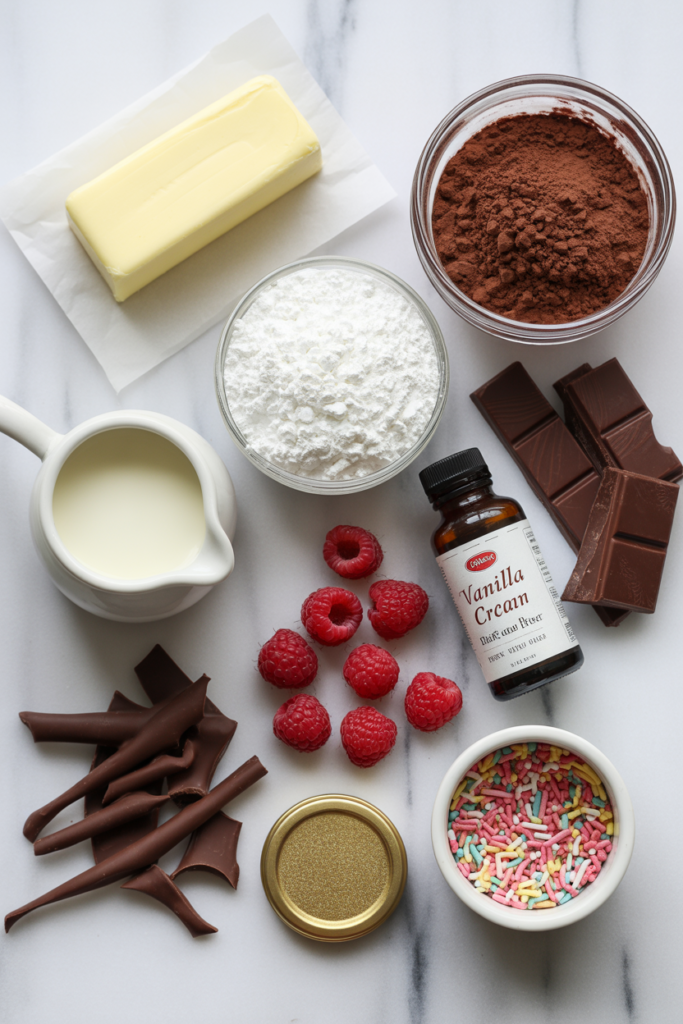
- ☐ 1 cup (225g) unsalted butter, softened to room temperature — cold butter will not cooperate and you will resent it
- ☐ 3 cups (360g) powdered sugar, sifted — sifting is non-negotiable unless lumpy frosting is your aesthetic
- ☐ ½ cup (50g) unsweetened cocoa powder, sifted — good quality cocoa makes a real, noticeable difference
- ☐ 3–4 tablespoons heavy cream — adds smoothness; add gradually until the texture is right
- ☐ 1 teaspoon pure vanilla extract — the background note that makes everything taste more intentional
- ☐ Pinch of salt — balances the sweetness; don’t skip it
For the Chocolate Ganache Drip:
- ☐ ½ cup (120ml) heavy cream
- ☐ 4 oz (115g) dark or semi-sweet chocolate, finely chopped — chips work too, but chopped chocolate melts more evenly
For Decoration:
- ☐ Chocolate shavings or curls — use a vegetable peeler on a room-temperature chocolate bar; it feels ridiculous and works perfectly
- ☐ Chocolate sprinkles or nonpareils — because sometimes simple is the right move
- ☐ Fresh berries — raspberries, strawberries, or cherries add color and elegance instantly
- ☐ Edible gold dust or luster (optional) — for when you want people to think you’re very serious about this
- ☐ Chocolate-dipped strawberries (optional but deeply impressive) — worth the five extra minutes
Recommended Tools
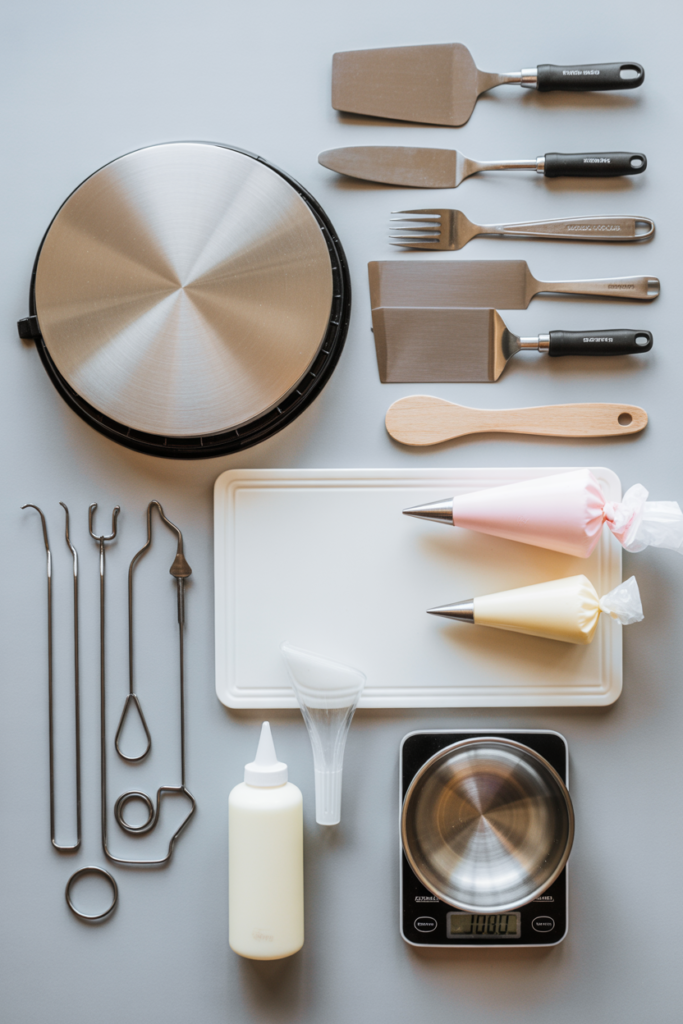
- Offset spatula (large and small) — the single most important decorating tool; straight spatulas cannot compete
- Cake turntable — makes smoothing frosting around the sides dramatically easier and more satisfying
- Bench scraper — for achieving those clean, smooth sides on the buttercream that look professional
- Piping bags — reusable silicone ones are worth the investment; disposable work fine too
- Piping tips — a 1M star tip and a round tip cover 90% of decoration needs for most cakes
- Cake board or drum — elevates the cake and makes transporting and serving much cleaner
- Digital kitchen scale — for precise ganache ratios that actually set correctly
- Heatproof bowl and saucepan — for making ganache via double boiler
- Microwave-safe bowl (alternative) — for making ganache the lazy but effective way
Step-by-Step Instructions
- Make the chocolate buttercream. Beat the softened butter in a stand mixer or with a hand mixer on medium-high speed for 3–4 minutes until it’s pale, fluffy, and looks nothing like the stick it started as. This step is where the magic begins—properly whipped butter creates a light, smooth base that makes everything easier to work with.
- Add cocoa and powdered sugar gradually. With the mixer on low speed, add the sifted cocoa powder and powdered sugar in three additions, alternating with tablespoons of heavy cream. Add the vanilla extract and pinch of salt. Once combined, increase speed to medium-high and beat for 2 more minutes until the frosting is fluffy, silky, and spreadable. Adjust consistency with a little more cream if needed.
- Crumb coat the cake first. Place your first cake layer on the board, add a layer of buttercream, and top with the second layer. Apply a thin, even layer of buttercream all over the outside of the cake using your offset spatula. This is the crumb coat—it seals in all the loose crumbs so your final layer looks clean. Refrigerate for 20–30 minutes until firm. Skipping this step is why final coats pick up crumbs. Don’t skip it.
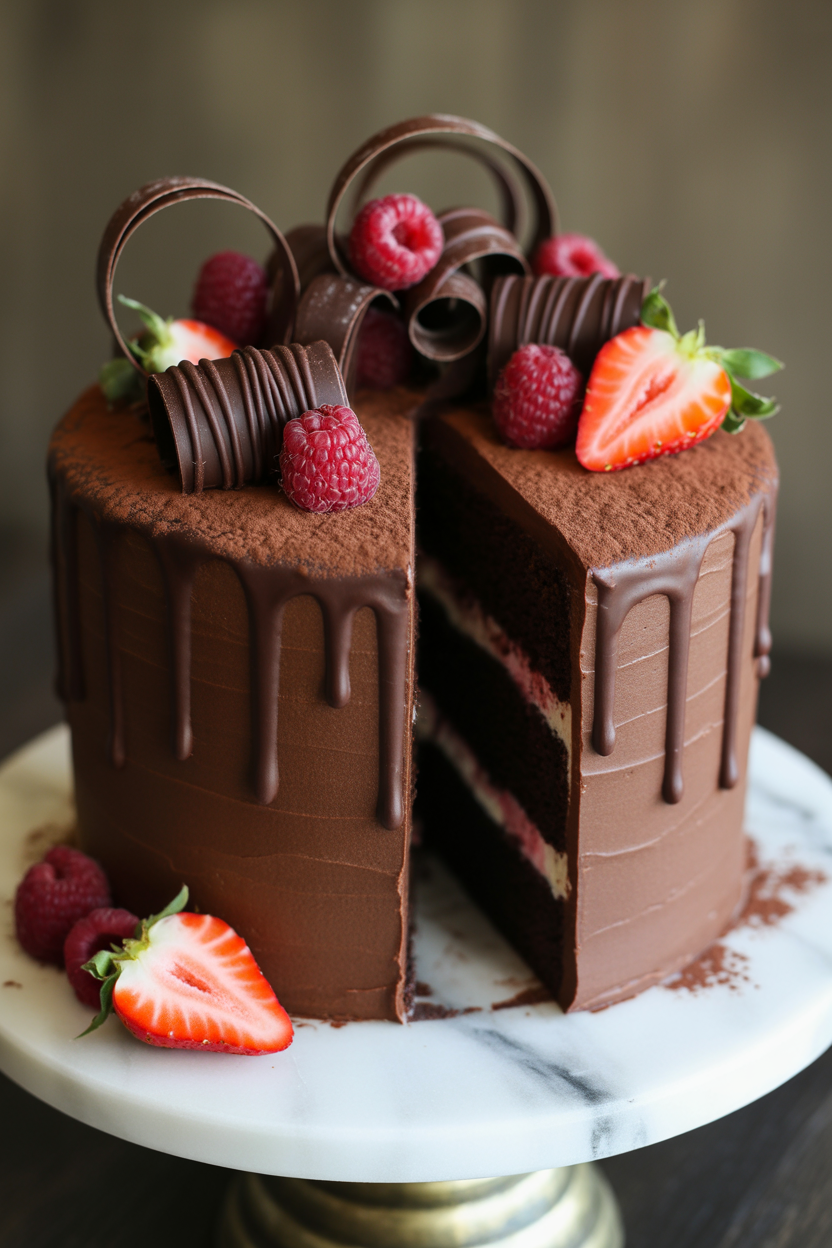
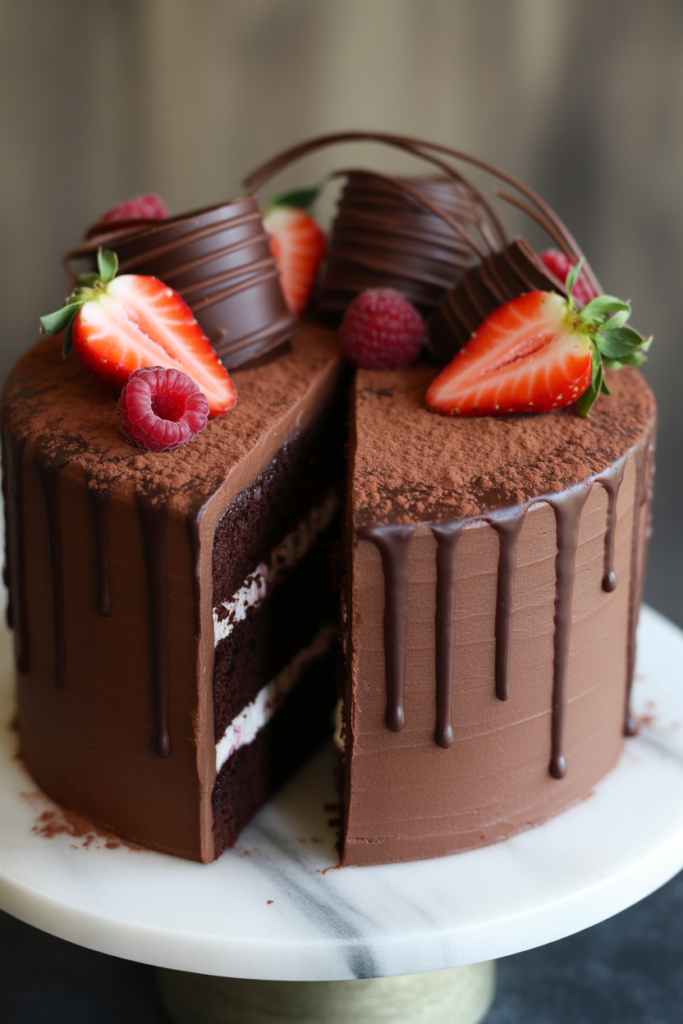
- Apply the final buttercream layer. Remove the chilled cake from the fridge. Apply a generous layer of buttercream to the top and sides using your offset spatula. Use your bench scraper held at a slight angle against the side of the cake and rotate the turntable slowly to smooth the sides into a clean, even finish. Warm the bench scraper slightly with hot water (dry it first) for an even smoother result. Chill again for 15 minutes.
- Make the chocolate ganache. Heat the heavy cream in a saucepan over medium heat or in the microwave until it just begins to simmer—not a rolling boil. Pour it directly over the finely chopped chocolate in a heatproof bowl. Let it sit untouched for 2 minutes, then stir gently from the center outward until completely smooth, glossy, and combined. Let it cool to room temperature before dripping—too hot and it runs off entirely; too cold and it sets before it drips. Patience here is rewarded.
- Create the ganache drip. Transfer the cooled ganache to a squeeze bottle or small piping bag for control. Starting at the edge of the chilled cake, squeeze small amounts of ganache and let it drip naturally down the sides—work around the edge first, then pour the remaining ganache over the center top and spread gently with an offset spatula. The cold cake helps the drips set quickly, giving you time to place them intentionally.
- Add your decorations. This is the fun part—go with intention, not randomness. Pipe buttercream rosettes or swirls around the top edge using your 1M star tip. Arrange chocolate curls, fresh berries, or chocolate-dipped strawberries on top. Add a dusting of cocoa powder or a light brush of edible gold if you’re feeling theatrical. Step back frequently and assess rather than piling everything on at once. Restraint often looks more elegant than excess.
- Final chill and serve. Refrigerate the decorated cake for at least 30 minutes before slicing so everything sets properly. Remove from the fridge 20 minutes before serving to let the buttercream soften slightly. Cold buttercream cuts cleanly but tastes much better at room temperature—this timing is worth remembering.
Nutrition Facts
Serving Size: 1 slice (1/12 of decorated cake, including buttercream and ganache)
| Nutrient | Amount Per Serving |
|---|---|
| Calories | 420 |
| Total Fat | 24g |
| — Saturated Fat | 15g |
| — Trans Fat | 0g |
| Cholesterol | 65mg |
| Sodium | 85mg |
| Total Carbohydrates | 52g |
| — Dietary Fiber | 2g |
| — Total Sugars | 44g |
| Protein | 3g |
| Calcium | 30mg |
| Iron | 1.5mg |
| Potassium | 140mg |
Values are estimates for frosting and ganache decoration on a standard two-layer chocolate cake slice. Cake base nutrition varies by recipe.
Recipe Variations
- Rustic Naked Cake Style — Apply buttercream only between the layers and in a very thin, deliberately imperfect coat on the outside so the cake shows through. Top with fresh berries, chocolate curls, and a dusting of powdered sugar. Looks effortlessly beautiful, takes half the frosting, and somehow makes you look more skilled, not less.
- Mirror Glaze Finish — Replace the ganache drip with a poured chocolate mirror glaze (made with gelatin, sugar, cocoa, cream, and water) for a showstopping, ultra-glossy finish that reflects light like actual glass. More advanced technique, genuinely jaw-dropping result—save this one for when you want to seriously impress someone.
- Chocolate Drip with White Chocolate Accents — Make the main drip with dark chocolate ganache, then drizzle thinned white chocolate over the top in a contrasting pattern. Add colorful sprinkles or edible flowers for a modern, graphic look that photographs incredibly well and requires very little additional skill.
Recommended Ways to Serve
- Celebration centerpiece — Present the fully decorated cake on a tall cake stand with candles, surrounded by a scatter of fresh rose petals or edible flowers on the table. Let people see it whole before cutting—that moment of presentation is part of the experience and absolutely worth staging.
- Plated dessert style — Slice cleanly with a warm knife (dip in hot water, wipe dry between cuts), plate each slice at a slight angle, add a small quenelle of whipped cream or a scoop of vanilla ice cream alongside, and drizzle a little extra warm ganache over the plate. Restaurant presentation, zero extra effort.
- Dessert table display — For parties, place the cake as the centerpiece of a dessert spread alongside chocolate truffles, brownies, and berries. Keep the decoration elegant and monochromatic—all chocolate, white accents, gold details—so it ties the table together visually and makes the whole spread look curated and intentional.
Storing and Reheating Guidelines
- Room temperature: A fully frosted and decorated cake keeps well at room temperature for up to 2 days if your kitchen isn’t too warm. Cover loosely with a cake dome or large bowl—plastic wrap pressed against the decoration will ruin it. Buttercream acts as a seal that keeps the cake moist underneath.
- Refrigerator: In warmer weather, or if the cake has fresh fruit on top, refrigerate it covered for up to 5 days. Pull it out 30–45 minutes before serving so the buttercream returns to its proper soft, creamy texture. Cold buttercream is dense and waxy—room temperature buttercream is what you actually want to eat.
- Freezer: Freeze decorated cake slices individually by placing them on a baking sheet uncovered until solid (about 1 hour), then wrapping each tightly in plastic wrap and storing in an airtight container for up to 2 months. Thaw overnight in the fridge or 1–2 hours at room temperature. FYI, decorated cakes freeze better than most people realize—the buttercream protects the cake beautifully.
Common Mistakes to Avoid & Fixes
| ❌ Mistake | ✅ Fix |
|---|---|
| Using butter straight from the fridge | Cold butter lumps and refuses to cream properly. Leave it out for 1–2 hours until genuinely soft. If you forgot, microwave in 5-second bursts carefully. |
| Skipping the crumb coat | Final coat picks up every loose crumb and looks like a mess. A 20-minute crumb coat chill costs very little time and fixes everything. |
| Pouring ganache while it’s too hot | Hot ganache runs straight off the cake and pools at the bottom. Let it cool to a thick, pourable consistency that holds a drip shape before touching the cake. |
| Decorating a warm or unfrozen cake | Buttercream slides, ganache runs everywhere, everything is chaos. Chill the crumb-coated cake fully before the final layer and the final frosted cake before ganache. Cold cake = control. |
| Using too much food coloring in buttercream | Liquid food coloring thins the frosting and changes the texture. Use gel food coloring—a tiny amount gives vivid color without affecting consistency. |
| Overloading decorations without a plan | A chaotic pile of everything looks messy, not festive. Lay out your decorations before placing any of them and visualize the design. Less intentional placement is more impactful than more random placement. |
| Cutting the cake immediately after decorating | The ganache and buttercream haven’t set. You’ll get a collapsing, smeared slice that looks nothing like the whole cake. Refrigerate for at least 30 minutes before cutting. |
Alternatives & Substitutions
- No heavy cream for ganache? Full-fat coconut cream works as a dairy-free substitute and creates a surprisingly rich, glossy ganache with a very subtle coconut undertone. It’s genuinely a great swap, not just a compromise.
- No unsalted butter? Use salted butter and simply omit the added pinch of salt in the buttercream. The flavor difference is minimal and nobody will notice.
- No piping bags? A zip-lock bag with a small corner snipped off works for basic piping in an emergency. It’s not elegant, but it genuinely works for rosettes, writing, and simple borders when you’re in a pinch.
- Dark chocolate ganache too bitter? Use semi-sweet chocolate chips instead, or add a teaspoon of honey or powdered sugar to the ganache while it’s still warm and stir to combine. Sweeten gradually and taste as you go.
- No fresh berries for decoration? Maraschino cherries, sliced kiwi, mandarin orange segments, or even dried cranberries all provide color contrast against a dark chocolate cake. Fresh mint leaves add a pop of green that photographs beautifully with almost zero effort.
- Buttercream too sweet? Add a tablespoon of cream cheese to the mix—it cuts sweetness with a slight tang and actually makes the buttercream taste more sophisticated. This is one of those upgrades that seems too small to matter until you try it.
FAQ (Frequently Asked Questions)
Q. Do I really need a turntable, or is it just a fancy unnecessary gadget? Ans: It’s not mandatory, but decorating a cake without one is like parallel parking without power steering—technically possible, significantly more frustrating. A turntable costs around $15–20 and transforms the smoothing process from a struggle into something almost enjoyable. If you’re decorating more than once a year, just get one.
Q. My buttercream has air bubbles. How do I fix it? Ans: After mixing, switch to the paddle attachment (if using a stand mixer) and beat on the lowest speed for 2–3 minutes. This pushes out the air bubbles and creates a denser, silkier texture. You can also press the frosting against the side of the bowl repeatedly with a spatula—old-school method, still works perfectly.
Q. Can I make the buttercream and ganache ahead of time? Ans: Absolutely yes. Buttercream keeps in the fridge for up to a week in an airtight container—just bring it to room temperature and re-whip before using. Ganache keeps refrigerated for up to two weeks and can be gently rewarmed to a pourable consistency. Making both ahead takes a lot of pressure off on decoration day.
Q. How do I get clean, sharp slices when cutting a decorated cake? Ans: Use a long, thin knife dipped in hot water and wiped dry between every single cut. The warm blade glides through buttercream and ganache without dragging or smearing. Cold cake cuts cleanest—slice straight from the fridge if presentation matters, then let the plated slices come to room temperature before serving.
Q. My ganache drip went too far and ran all the way to the bottom. What happened? Ans: The ganache was too warm or too thin, or the cake wasn’t cold enough. Let the ganache cool further until it holds a slowly dripping consistency when tested with a spoon. Always test one drip on the side of the cake first and wait 30 seconds before committing to the full edge.
Q. Can I use store-bought frosting instead of making buttercream from scratch? Ans: You can, but should you? That’s the real question. Store-bought frosting is softer, often too sweet, and doesn’t pipe or smooth nearly as well as homemade. If time is genuinely critical, mix store-bought frosting with a tablespoon of softened butter and whip it briefly—it improves the texture considerably. But honestly, homemade buttercream takes 10 minutes and the difference is enormous.
Q. How far in advance can I decorate the cake? Ans: You can fully decorate a cake up to 2 days ahead and keep it refrigerated. The buttercream actually helps preserve the cake underneath. Avoid adding fresh fruit more than a few hours before serving since it can weep and affect the frosting. Everything else—ganache, chocolate decorations, piped elements—holds up beautifully over 48 hours in the fridge.
Latest Articles
-

Chocolate Cake Decoration: Make It Look Like You Actually Tried
-
-
🥬 Kitchen Vegetable Storage: Keeping Your Harvest Fresh as a Dew-Kissed Meadow
-

Air Fryer Baked Potatoes: Crispy Outside, Fluffy Inside, Zero Patience Required
-

Hashbrown Breakfast Casserole: The Breakfast That Does All the Heavy Lifting
-
🍳 Kitchen Decor Ideas: Transforming Your Cooking Space into a Warm, Functional Meadow
Final Thoughts
And there it is—a fully decorated chocolate cake that looks like it required training, when really all it required was a good offset spatula, a little patience with the ganache temperature, and the willingness to commit to the crumb coat. Decoration transforms a cake from “I baked something” to “I made something”—and that shift matters more than people give it credit for.
Start with the techniques in this guide, practice once or twice, and watch how quickly your confidence builds. The second cake always looks better than the first. The third one starts making people genuinely ask where you learned to bake like that. That’s the trajectory, and you’re already on it.
Now go smooth that buttercream, drip that ganache with confidence, and present a cake that makes the room go quiet for a second. You’ve absolutely earned the applause. 🍫🎂